Thursday, July 10, 2014

The Materials I Use

I'm quite often asked (especially on YouTube) what materials I use, so the person asking can go right out and buy all the stuff at once. It's not really that simple. The materials I prefer may not be what someone else would choose, but I guess it's somewhere to start if you really have no idea about what you should get.

 I have used quite a few clays in my creative travels, but I didn't find a favourite until I came across Chavant, medium hard grade. This clay has been my mainstay, as well as the choice of many a sculptor in the FX business. But I have actually found something I like even more: Monster Maker's "Monster Clay". This stuff is very firm until you warm it, either by putting it in your microwave oven for a short while, or (as I do) by simply using a heat gun on it. You can melt it down to a puddle if you choose, and while it's soft you can slap together large rough shapes. As it cools you're able to work lots of minute detail into the clay, and you can handle your sculpture quite roughly without squashing it.

I use a variety of sculpting tools, but the ones I'm holding up here are my three most effective. The red one on the right is home-made, using an old brush handle and simple steel wire epoxied in place. I use this tool to work in both larger and smaller details. The middle tool has two hard rubber points, which are very useful for creating soft, but defined shapes. The larger loop tool to the left is used to smooth out the shapes made by the other two tools, and also to create larger shapes.
To soften the shapes further I put some Vaseline (petroleum jelly) on a finger, and rub it over the clay. I also have texture stamps made by applying latex or firm silicone rubber over surfaces with interesting textures, like bumpy plastic displays in cars or various fruit. I seldom use them nowadays, but these flexible texture stamps are a quick way to add interesting surface detail to your sculpture.

I use only really hard plaster, mostly some brand of dental stone. Hobby plaster will deteriorate very quickly, and if you plan to re-use your plaster moulds for new projects, you'll find that they won't hold up for very long. In short, buy your plaster from a dental supply shop, which is easy to find online. I keep all my plaster in a big plastic container, with a tight snap-on lid to keep dust and moisture out.

Latex can be considered a fairly primitive material now, but it's also one of the most reliable and cost-effective. I really should get on with using silicone for my puppets and masks, but I still find latex far more enjoyable and easy to work with. You can also find it at lots of places, from sculpture shops to hobby shops.
I often mix the latex with other materials, mostly cotton, to add volume. But it's important to remember to never add a cotton/latex mix to an area of the puppet which needs to be soft and bendable.


 For my puppet skeletons I only use aluminum wires of varying thickness. I have used advanced ball & socket metal armatures as well, but I often find them lacking in some aspect, mostly regarding movability. Aluminum wire allows you to bend your puppet's limbs in any direction, until the material covering the wire and padding the body can't be compressed any more, and starts to spring back.

To create the "bones" or the hard parts of the wire armature I use Friendly Plastic thermoplastic. This material is brilliant, and I've been using it for years for all sorts of things. I've made entire sword handles from it, as it's very sturdy. You melt these plastic strips with a heat gun, and if you have to re-do something, just melt the stuff again and again.

I pad the bodies of my puppets with the softest urethane foam I can find, which I simply collect from old cushions and mattresses. I piece together the foam bits using a brand of contact cement, which I believe is manufactured in Sweden. The Casco contact cement is yellow, smelly and dries to a strong flexible bond. It's perfect for puppet work, and I also use it for many other types of projects.
Master animator and puppet builder Jim Danforth recommends a brand called Pliobond.

This is my trusty Black & Decker heat gun. I've had it for over 10 years now, and it hasn't failed me yet. It's a real workhorse. I use it to quickly dry latex in a plaster mould, to dry paint, to soften the Monster Clay and melt the Friendly Plastic. It's an invaluable tool for me.

When I paint the rubber skins of my puppets and masks I use either latex tinted with Kryolan tinting powders or Universal tinting liquids, or I sponge on PAX paint; a mix of Prosaide make-up glue, and acrylic paints. There's a type of Prosaide formulated especially for making PAX, called No-Tack, which means it doesn't have the stickiness of normal Prosaide.
But when the base paint is dry I attack my subject with an airbrush, in my case the Iwata HP-C double action airbrush pen. I can't say if this model is still available, but it's another little tough guy, very precise and easy to clean. I use a small air compressor specifically made for airbrush work.

I've used a variety of airbrush inks. Right now I'm into the Liquitex line of airbrush acrylics. I only use airbrush paints that are water-based. Cleaning up your pen can be a real hassle otherwise.

Moving on to other materials, which I use for prop-making. I've found that the Dragon Skin FX-Pro silicone from SmoothOn is ideal for making soft, elastic moulds in which you cast plastic or plaster items. These moulds last forever, the materials are easily mixed on a 50/50 ratio, and the silicone sets up fast -within about 45 minutes you have a usable mould.
I've also made masks and puppet parts out of Dragon Skin FX-Pro, and there are many ways you can vary the softness of the silicone using additives. I can also recommend PlatSil Gel 10, which is another easy to use silicone ideal for both moulds and mask/puppet projects.

The material I use more than any other for casting props, fake jewellery, puppet armature skulls, etc, is SmoothOn's Smooth-Cast 325. It's another 50/50 ratio mix material, and it can be tinted with other SmoothOn products. Smooth-Cast 325 is ideal for "roto casting", which means that it sets on the inside of your silicone mould if you start to turn it. In other words, you can cast hollow objects of almost any size -from tiny puppet parts to big monster skulls. This plastic also sets very quickly.
Sometimes I use Smooth-Cast 65D, which is more elastic, and therefore able to take a bigger beating.

Are these material expensive, then? Well, the SmoothOn products cost a bit, but are worth every penny. The Monster Clay is also quite pricey, but other than that you won't have to spend an arm and a leg tooling up for your first puppet or mask project.

Friday, June 27, 2014

Aladdin, the Finished Film, and Behind the Scenes

I finally finished my day job film project "Aladdin and the Magic Lamp" this month. It's been a lot of work. The film ended up at 35 minutes, all of it greenscreened. I edited the film with a couple of our project participants, which all have some disability of some kind, both mentally and physically. This film may not be as slick as some of the other stuff I've made, but then again, it's not my film. This is the collective result of our mutual efforts, where all involved have done the best they can. There's no shortage of enthusiasm, but sometimes the effort, understandably, doesn't match the performances of people with perfect health. Having said that, I think there's a LOT to enjoy. For those of you mostly keen on seeing the genie (which seems to have attracted some interest) he appears first at 8:00. I'm afraid the film is only in Swedish.


Joakim, who is one of the extras and also plays a guard, did this little behind-the-scenes-with me. In this video you can see a quick runthrough of the genie make-up, and you'll also see how simple our greenscreen set-up was.

Wednesday, May 7, 2014

Aladdin: Props and makeup

As I've mentioned before in my posts, right now I'm working half-time at a project called "Media Power", where special needs people of all ages learn how to blog, make interviews, do pod casts, make videos, and generally find out how to use the free social medias to promote themselves and their various interests. I'm the technical go-to guy, and I also try to think up fun stuff for the crowd to do. Last year we made three short films; among these "Beans vs Aliens", which I covered in a couple of posts here. 


Now I'm feverishly editing our next project" Aladdin and The Magic Lamp", which was all shot in front of a green screen. This means I'm now spending my days (and sometimes nights) compositing every single scene for this 20-minute film. It's a huge experiment, and an incredible amount of work. However, I felt this was the only way to make a visually exciting representation of this evergreen fairy tale.


My two co-workers on the project, Jenny and Mia, have worked very hard on it too, but the brunt of the work has fallen on my shoulders. I feel that my colleagues don't feel it's necessary to put in as much effort into the production as I do. But I want people to be surprised at what we have accomplished, using fairly primitive equipment. As for our actors, they're certainly a motley crew both in talent and commitment. Emil, who plays Aladdin, is doubtlessly the big star, carrying the narrative of the fantastic story with great panache.


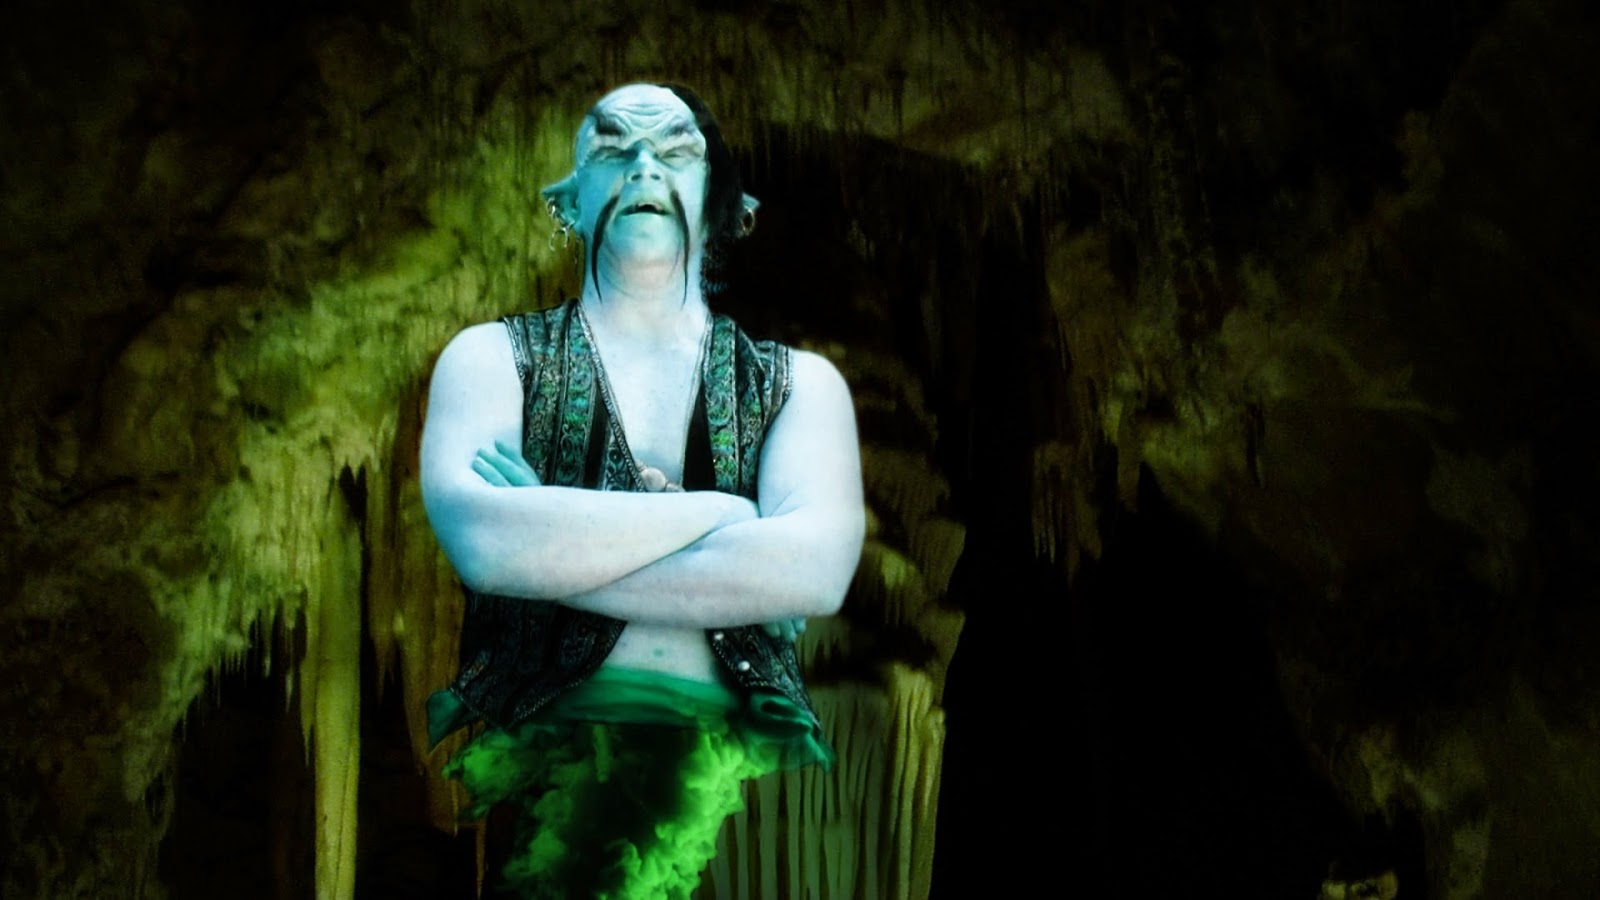
I thought it might be interesting to show some of my work on this project, so lets start off with the genie of the lamp. Not having a properly impressive genie would make for a poor Aladdin story, so I decided to apply some rubber to the face of our genie actor Henrik to make him less meek in his appearance. I slush cast a bald cap, a forehead and two pointy ears in latex, using old plaster moulds made for orc and dark elf mask pieces. The appliances were stuck on with ProsAide glue, and the edges covered up with a ProsAide/microballoon paste.


Crepe wool hair was used for the eyebrows and mustasches, and also for a ponytail eventually added to the top of Henrik's head.


Rubber mask greasepaint covered with a sealer was used to blend skin and latex to a uniform look.


I can't say that Henrik particularly enjoyed the process of being made up into the genie, but once the makeup was complete and he went in front of the camera he forgot about the uncomfortable mask, and acted out his domineering genie part to the hilt!


When filmed Henrik sat on a stool with a piece of the greenscreen tucked into his pants. A red sash provided a barrier between his body and what would in After Effects editing become a traditional legless smoke-pillar lower body. His skin tone was also changed in AE to a properly alien-looking hue.


I wanted to create the look of old Hollywood Arabian Nights epics, where lush costumes make up a big part of the overall enjoyment. For example, we were going to have a couple of palace guards pop up here and there, and I wanted them to have a special look as part of my big scheme. I decided to build a golden shield to be carried by the guards, and used an old plastic snow saucer I bought years ago. My plan had always been to make a shield out of it, but I never got around to it until now.


First, the two handles had to come off, and I used a Dremel drill tool to cut the thick plastic.


I saved one of the handles to create a simple grip on the back side of the shield. Some soft yarn made the handle more comfortable to hold.


The handle was stuck to the shield using hot glue and screws. Bits of wooden dowel placed in the handle ends created durable points of attachment.


Before painting the shield I'm adding some detail. During the summer I haunt the local flea markets and garage sales in search of various interior design brick-a-brack. This piece here is apparently the decorative end bit of a curtain rod. It looks exactly like those brass studs and plates stuck to leather armour in Roman Empire epics, making them look functional as well as attractive. In fact, pieces like this will add some glamour to mostly anything, as you'll soon see.


I'm making a silicone mould from this piece, so I can cast any number of copies in plastic.


A simple containment wall was created using thick paper sealed up with hot glue.


DragonSkin FX was poured over the metal plate to create the mould.


When the silicone had set, SmoothCast 325 dyed black was used for the casting process.


Here's the first one out of the batch..


..And here's a bunch of them, all produced in an afternoon.


The "Roman studs" were stuck on with hot glue, along with some other decorative cast pieces, including a lion's head moulded from a toy shield.


A coat of black base paint was first sprayed on..


..Then followed by durable gold spray paint. I found a metallic paint that stinks to high heaven when you use it (preferably outdoors) but won't chip off as far as I can detect. Subconsciously I seem to have been slightly influenced by the snazzy shield carried by Harry Hamlin's Perseus in Ray Harryhausen's original "Clash of the Titans".


To show just how fast and easy you can piece stuff together, here's a "steel" chest plate made from an ordinary paper plate, another plastic lion head cast, and studs made out of hot glue squeezed into a silicone mould.


Joakim, playing one of the palace guards, is here see sporting the full ensemble. The sword is plastic and aluminum, created for another film project years ago, and the helmet is real steel, and built by my blacksmith buddy Martin Merkel. The armour is real leather, but all the decorations are plastic castings.


I couldn't find a real old oil lamp, and the only ready-made fake option was the Disney version. I opted to make my own instead using a cheap sauce boat with some Monster Clay added.


Hot glue and thick paper was used to create a containment area for the silicone.


Skipping the silicone-pouring part, here's the plastic cast right out of the mould.


Some epoxy paste and a plastic bead creates a small lid on top, and a copper spray paint guilds the lily.


Making chroma key effects with consumer film recording equipment is asking for trouble. The results vary from really good-looking to merely passable. The nay-sayers (and there are plenty of those in my native Sweden) ask what the point is then, if I can't make it look professional all the way through.


But I can't be bothered with those who ask "why", just the ones who ask "why not?" There are many levels of creativity, and if you're not making your art for the sake of commerce, then it's your damn duty to make it for the fun of it.
Lastly, and perhaps not surprisingly, I've managed to infuse this version of Aladdin with some stop-motion monsters. More about those in an upcoming post.


Friday, May 2, 2014

Brutus the Zombie Bear

Late last year Mark Anthony del Negro contacted me through Facebook about building a zombie grizzly bear puppet for a horror film he's making with a bunch of friends. Yes; it's taken me all this time to finally finish the darn thing dubbed "Brutus" by us working on the film project. It's just one of the reasons I really shouldn't take on any puppet building requests. I'm simply too tied up in lots of other stuff. But I'm hoping to remedy that soon, by being smart and just saying "NO" to stuff I probably won't find terribly fun to do. Money will have to trickle in through other sources. My ambition is to keep on making puppets for people ambitious enough still wanting to use stop-motion in their films.


Since I'm dealing with a "real" animal this time, I took extra pains to get the anatomy looking OK. You'll have to be the judge of how well I succeeded, though. I sculpted a miniature bear skull and jaw in Monster Clay, and stuck them onto a pair of screws.


The screws were then pushed down into clay blocks for the casting of the silicone moulds. I used DragonSkin FX Pro, and SmoothCast 325 (both from SmoothOn) to create the flexible mould and the cast skull parts.


Here's the finished skull with aluminum armature wire attached. The brown lower canines are built up with Aves epoxy putty, due to the plastic casting having problems with air bubbles. One of these days, funds permitting, I'll but a small vacuum chamber to get rid of any bubble casting problems.


And here's the skull and jaw attached to the aluminum wire/Friendly Plastic armature. At this point only the hind feet have tie-downs, but the front paws were similarly equipped too, eventually.


Brutus was supposed to look like a big scary bear, but will certain tell-tale signs that he's not properly OK. The biggest of those is his completely open stomach and rib cage. I sculpted the rib cage in Monster Clay, and created a DragonSkin silicone mould over the finished piece.


The cast SmoothCast 325 rib cage has been cleaned up and attached to the armature.


As you can see on this closeup of the skull, I've painted the teeth and gums, added a small piece of plastic-covered copper wire to animate the nose and upper lip, and attached an armatured silicone tongue. The tongue wasn't cast, but built up directly over a piece of aluminum wire using flesh tone Sculpt Gel.


Another Monster Clay sculpt, this time of Brutus´ head over the skull armature.


Originally I had planned to cast the head skin in silicone. Eventually I just used latex, which works well with this character. Brutus isn't looking completely healthy. He's covered with signs of decay, and his eyes have gone zombie-like.


Since Brutus´ body was going to be covered with fake fur, I just made a very simple foam padding build-up. These photos show the beginning stage. More padding was added eventually. You can also see that the rib cage has been given a build-up of cotton fibres dipped in latex to simulate tendons and skin.


Brutus´ guts are all made out of latex, some cast in plaster moulds, and some built up. The long intestine at the right is a piece of aluminum wire covered with red string and dipped in latex. When attached to the rib cage, the intestine can be animated swinging about as Brutus walks. Tasteful, I know!


Here you can see the guts in place and the fur build-up under way. I'm using a semi-flexible fur cloth, which I also used for a King Kong puppet I did a while back. Nothing fancy, just something I was lucky enough to find in a local crafts shop.


And here's the finished Brutus. The fur on his face was built up using small tufts of the fake fur, attached one bit a time with ProsAide make-up glue. His neck and pelvis are covered with painted-on "gore" (acrylic paints).


I'll do a short test animation of Brutus myself, and I might use the moulds for the bear skull to create a puppet of my own eventually. It's very hard making decent-looking puppets of real animals, and I stand in awe of every artisan who can pull it off. The stop-motion lions and horses in "Mighty Joe Young" (1949) built by Marcel Delgado are the very apex of this craft.