Showing posts with label masks. Show all posts

Monday, August 31, 2015

New Home Page!


I've finally revamped my old, sad home page, with a big help from my buddy Daniel Blohm. It's still a work in progress, but a little at a time I'll get there. Go check it out HERE :)

Wednesday, September 21, 2011

Wrestling With the Gorn!


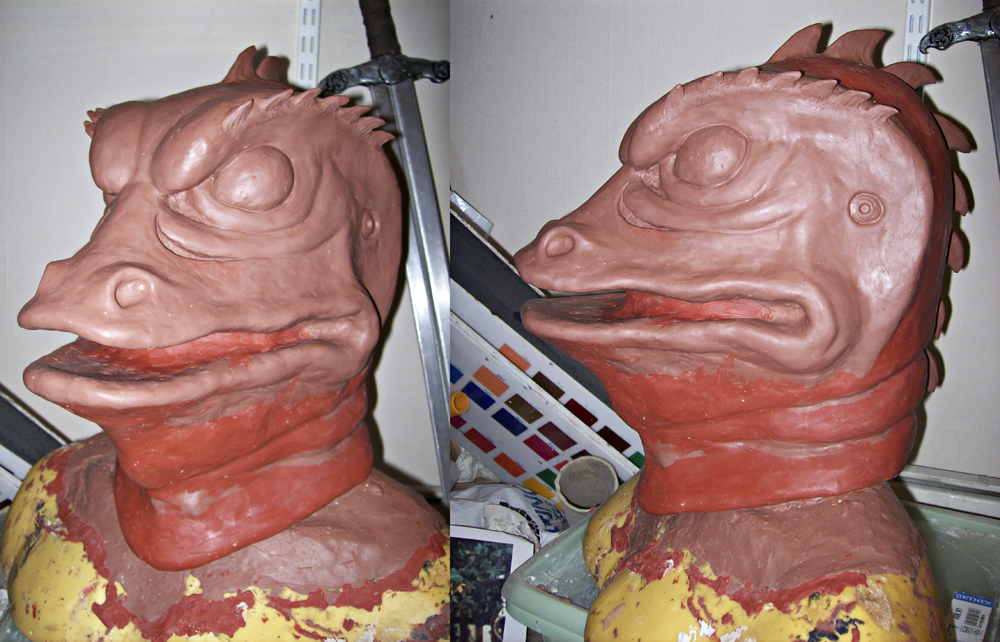
I knew the Gorn captain of TOS episode ”Arena” was a tough cookie, having withstood the considerable combat expertise of James T Kirk. I just didn’t exactly know how tough he was until I tried to make my own mask of him. The head of the lizard-like Gorn is a deceptively simple mask. He almost looks like a green, fanged Donald Duck variation. But as I started sculpting the head in clay I realized how difficult it was getting all the details right, and the Gorn head is full of subtle details. The truth is if you don’t understand that and manage to recreate all those details, the Gorn head will look suspiciously wrong in some hard-to-define way. Wah Chang, who created the Gorn head, as well as the salt vampire, the Balok effigy, the ape/pig creature from “The Cage”, the Romulan head gear and battle cruiser, the phaser, the tricorder and pretty-much-you-name-it on TOS, was an endlessly creative man. Besides coming up with great stuff on a very tight budget, he also had a true visionary eye for shapes that would stick in your mind. His Trek aliens and props you remember because of their perfect simplicity and originality. So, nailing down Wah Chang’s Gorn head was no easy task!


Wah Chang’s mask is actually not symmetrical; The right brow ridge is larger than the left, the nostrils aren’t exactly centered, etc. I decided to try and make my mask as symmetrical as I could. There’s very little information about how the Gorn mask worked. Apparently, there were two sets of see-through holes, one just below the frown in the eyebrows and two (pretty obvious) slits below the eyes. Both holes were sculpted into the mask as hollowed-out spaces.


It took a loooong time to get the mask sculpture finished. It kept growing until I ran out of my clay of choice, Chavant. I had to resort to another clay (the redder one) that was a bit too soft for the purpose, but it worked out fine in the end. In order to finish the mask on time for Wonder Con (where it would be displayed by Judith Daniels of alienhair.net) I skipped adding the scales or warts in clay. More about that in a minute.


In order to avoid airbubbles I always brush on the first layer of plaster. I doesn't take care of the problem perfectly, but it certainly helps.


Several layers of plaster follows, including one with burlap dipped in plaster. This is done to add some reinforcement to the plaster mold.


I forgot to add that a dividing clay wall is built up around the mask sculpture. This is done so I can make a two-part plaster mold. When the front half is done I turn the sculpture on its nose and continue to cover the back with plaster. The exposed front half plaster seen here is coated with vaseline. The small round dips you can see in the plaster will be filled out when the back part is made, and will create interlocking keys for the two mold halves. Important stuff, if you want to keep your whole mold together!


When both mold halves are finished and the plaster has been allowed to cool, it's time to part the mold pieces and take out the clay. Screwdrivers are used the pry the mold halves apart. The burlap reinforcements now help keep the mold from cracking.


After having cleaned out the clay, the mold halves were put together and allowed to rest overnight. This is done so some of the moisture will evaporate from the plaster. The insides of the mold halves are then coated with liquid latex. The latex is sponged on in order to reduce airbubbles in cramped spaces. A few coats goes on, including cotton dipped in latex. This will help make big areas, like the nose and the back of the head, sturdy and make them hold their shape. Finally, the mold halves are put together and a few more latex coats are put over the seam between the halves.


After letting the latex set properly I could remove the casting the next morning. There was a bit of "flashing" in the latex casting where the mold halves created a seam. This is alomst unavoidable and the flashing is quite easily removed with a small pair of sharp scissors.


The seam is also covered with sponged-on liquid latex. Now comes the time for adding the bumpy scales. I simply dip a wooden sculpting tool in latex and leave a drop of it on the mask. Then another, and another. This may seem like a deadly dreary job, but it's actully taken care of pretty quickly. It took me about an hour to cover the mask this way. Had I sculpted every bump it would've taken days.


Here the mask has had its first coat of paint applied. I just mixed some latex with different tints and sponged it on. As this paint is latex-based it really bonds with the mask. It also becomes very sticky and can easily attach to itself, which is why I added a liberal coat of corn starch on each section I finished painting.


And here's the finished mask. The teeth were cast in latex from old plaster molds used for creating horns and claws for puppets. The eyes were a bit of a bother. I have no idea what the Gorn's eyes were made out of, and nobody else seems to know either. I settled on making them a sort of insect eyes, with hexagonal shapes covering the surface. The eye was sculpted by pressing an allen key into a clay sphere. Over that I created a silicone mold, in which I could cast hollow plastic eyes. The eyes were then painted with a tough metallic spray paint bought at an auto shop.


Now, I have a pretty big head (perhaps in more ways than one), but this mask was very roomy even for me. When I put it on I could look out through the holes below the eyes; That worked out fine. I had covered them from the inside with a black veily fabric and had no trouble moving around, though quick head moves made it more difficult to see where I was going.


I'm quite happy with my Gorn mask. For a first attempt it's pretty darn good. I may still take another stab at this character eventually. I want to get the eyes just right, for one thing.

So how did things go at Wondercon? Pretty good, actually, as Judith managed to sell the mask to none other than Bobby Clarke, who played the original Gorn! He'd been looking for a decent Gorn mask for sometime, but not really finding anything that met with his standards. He remarked that my mask seemed "small" and that the eyes of the original Gorn were made out of sequins. Other than that he was apparently happy enough with it to buy it.

Tuesday, September 20, 2011

Cardassian Latex Mask Pieces

I once made some Cardassian mask pieces for a Trekkie friend  using liquid latex. I often make masks and mask pieces to be glued to the face for friends into fantasy live-action role-playing ("LARP"). Liquid latex is far from the ideal mask material. It's really not soft enough to provide enough flexibility for masks glued to human skin. Foam latex is the movie industry standard, although silicone is being used more frequently now. Both these materials are soft and stretchy, and allow the actor to perform. But using ordinary liquid latex has been suprisingly successful for my LARP friends. You just have to use it in a clever way. Breaking the masks up into smaller pieces with spacing between them to allow the skin to move usually does the trick. Also, adding strips of upholstery foam or expanding polyfoam helps. Whipping up the latex with an electrical whisk before you pour it into your mask mold often works very well, but that's depending on what brand of latex you're using.


All of the mask pieces starts off as sculptures in oil-based clay. Since I didn't have a cast of my customer's head I used a female porcelain wig stand to sculpt on, and crossed my fingers the fit would be OK. For the shoulder and collar bone pieces I'm using a hard polyfoam bust bought many years ago from monstermakers.com
My favorite plaster is Ultracal 30. It's very hard and duplicates small details very well. After the first layer, which is brushed on, I slap on another layer with burlap dipped in plaster.
The burlap reinforces the plaster, preventing it from cracking when the mold is pryed off the sculpture. After the mold is removed the clay is cleaned out. Liquid latex is sponged into the mold, making sure airbubbles are avoided (as best one can). Using a sponge helps make the edge of the mask piece very thin, which is something you want when you glue it to your face. The latex piece is dusted with talctum powder (or corn starch) before being removed. If you don't do that the inside of the latex piece will stick to itself.

My friend Liz acted as a makeup model, very patiently letting me stick scaly rubber pieces all over her face and down her cleavage. I decided to color all the pieces with a neutral human skin tone by mixing latex and pigments before casting the latex into the molds. I did this because at this time I was practically out of the ingredients for making "PAX paint"; a very strong makeup base made with ProsAide glue and acrylic paint. After having applied the mask pieces I would've covered both Liz´skin and the latex pieces with PAX. The forehead piece is not yet trimmed in this photo.


Using the little ProsAide I did have I made some "bondo"; a paste mixed from Cabosil powder and ProsAide. I covered all the transitions between mask and skin with the bondo, making the mask edges practically disappear. This little trick helps selling the illusion better. In this photo I've applied the bondo to the nose and chin pieces.


So, here's the finished mask job with the Cardassian pale greyish yellow skin tone added in Photoshop. A bit of cheating, I know, but this at least shows how the mask will look when applied and painted properly. Having cast the mask pieces in human skin hue helped make the Photoshop tweaking easy. And that's the Cardassian insignia in the background.


While playing around with glue and rubber I also made Liz up as a Vulcan, using ears that are usually created for Elven LARPers. The ends of her eyebrows are covered with wax and bondo, with makeup powder added. You can get a VERY smooth finish using bondo, if you don't ladle it on to thick. Just wet your index finger in water and lightly rub over the bondo paste to smooth it out.


I glued down the latex pieces using spirit gum, but ProsAide is a better adhesive. Do remember to use a proper remover, though. Bond-Off is a really good one. All the latex mask pieces worked fine, especially those stuck to Liz´face. The neck pieces were the only worry, buckling and wrinkling in a weird-looking way when Liz raised her shoulders. So back to the drawing board with those. I added soft polyfoam to the neck pieces, which helped.
But all in all, mask pieces made in liquid latex need not be a horror to wear. Latex is a good economical choice compared to foam latex and silicone and it's up to each and every person to decide if it's something that would be OK wearing during a day at a con.


This image is really a cheat, because it was created in Photoshop, but it shows Liz in makeup as a Star Trek: Original series Klingon warrior woman. It's a design experiment to see if it would be a good idea to make a fan film with her in this getup. It'll probably happen some time.


One last image: I eventually made up my friend Rolf (sadly gone now) as a Tellarite ambassador. I wish I would've filmed him like this and saved the footage for some future project.

Friday, September 16, 2011

Star Trek Alien Masks

A few years ago I was a member of the Trekspace Star Trek fan page. When I eventually left, the blog posts about Trek props and masks I had made on that page disappeared. For a while now, people have been asking me to re-post the same info, so I'll be doing just that. Hopefully it'll be of interest to any wayward Trekkie dropping in here, or just to anyone curious about how to make your own latex mask pieces.

I'll start off with a bunch of molds I made for simple Trek alien masks. I make all my masks in either liquid latex or silicone. Latex is cheap and easy to handle. This means low costs and quick production time. Silicone is infinitely more flexible than latex and very skin-like. The problems with latex are that some people may be allergic to it and that the material isn’t quite as flexible as you’d want it to be. The problems with silicone are that it’s expensive, hard to paint and a bit of a hassle to cast. There are good uses for both, however. A simple false nose, ears or a forehead will work just as fine in latex. If you want a full face with great movability, say for a character like Odo, silicone is ideal.


But before getting started with any of these materials it’s all about getting a decent sculpture as the basis of your mask. The choice of clay and tools do the trick. I prefer the oil-based clay Chavant, but any oil- or wax-based clay that’s not too soft is good. I have a stack of tools that I use for different purposes. The ones I hold in my hands most of the time are loop tools. Often, they are a bit clumsy for really detailed work so I’ve made small loop tools by attaching steel wire to old brush handles using “Friendly Plastic” thermo plastic. But you can also use plumber’s epoxy.


I use a face plaster cast to put my mask sculpture on. You can make one yourself casting your own face or a friend’s face. I might go into techniques for doing that in another blog. I’m using a cast I made myself from a bought polyfoam bust, since these masks will all be generic. The plaster face is often referred to as a “positive” while your mask mold will be the “negative”. When casting with foam latex or silicone, the mask material will be put in between these two parts. The sculpting process in itself is about adding and taking away clay. If you want some really excellent advice on sculpting techniques I recommend that you check out any of Mark Alfrey’s instructional DVDs. From time to time, I put a tiny amount of Vaseline on my fingers and rub on the clay surface to smooth it out. I use a closely cropped brush to get at where my fingers can’t reach.


Here’s an important detail: If you leave your mask sculpture without any skin detail it’ll just look flat. Add some pores by laying a piece of soft plastic, a plastic bag for instance, over your sculpture and gently press with a pointed tool on the plastic. This will leave subtle little markings that’ll add plenty of life to the mask.

I’ve done a version of the Bajoran nose ridges here (the Bajorans are a very human-like race). I’ve made a clay wall around the sculpture marking where the so-called “cutting edge” will be. When making mask pieces in foam latex, the cutting edge will result in a very thin edge on the finished foam mask, making it easier to apply and cover. You really don’t need a cutting edge while casting latex, but I prefer to put one in anyway, since it shows me how far out I’ll be putting the latex in the finished mold. This will help making every casting virtually identical. I’m using a softer clay for the cutting edge. The one I’m using is also oil-based, but it’s more common to use a water-based clay. Klean Klay is very popular for this in the US, but I can’t get that in Sweden so I’m sticking to what I can find to do the trick.

I use a plaster called Ultracal 30, which is very durable. It will hold up to repeated castings much, much better than ordinary hobby plaster. I always brush on the first coat of plaster. Here I’m using a small brush to get into all the details. This will help eliminate air bubbles in the finished plaster cast. After this first layer I put on a big gob of plaster. Notice that I’ve built up a wall with the softer clay surrounding the sculpture to help keep the plaster in place while it sets.

After the plaster has set up it’s taken off the sculpture and any residual clay is cleaned off the cast. The best time to remove the plaster mold is when it’s hard, but still a bit warm. Then it’ll come off pretty easily.
This sculpture is based on the Andorian look from “Star Trek Enterprise”, which differs from the The Original Series look. They have a pair of antenna, which will be created separately and attached to the mask.


Another cutting edge put on using the softer clay.

As this is a bigger sculpture, I’m using a bigger brush to cover up more quickly. Again, after the first layer has set up I add a thick layer of plaster on top. Have a bowl with some water to wash your brush in directly after having applied the plaster. NEVER wash your brush in a sink. The plaster will clog up your pipes and wreck them. If you have a soft bowl, (sculpture houses sell rubber bowls) just use very little water and leave the bowl with the dirty water in it after you've cleaned your brush. After a few days the water will have evaporated and you can clean the dried up plaster out.
This is a Tellarite mask design, mostly based on how they look in the TOS episode “Journey to Babel”. I’ve added some other details based on their look in ST Enterprise, mixed with some of my
own ideas.

After adding the brushed-on plaster layer I can recommend that you put on a layer of soft burlap pieces dipped in plaster. This will act as reinforcement to the plaster mold and give it extra strength. This can be important when you pry your mold off your plaster face positive. If your mold isn’t thick enough or reinforced, it may crack. So add that extra layer of burlap just to be sure. When I have to dip into the Ultracal plaster with my fingers, I cover my hands with surgical latex gloves.

Here is a weekend’s worth of mask plaster molds. At the top left is also a Romulan forehead and below the Andorian cast are the tips of the antenna. When prying the mold loose from the plaster face positive I use a flat screwdriver. Using gentle force I get the mold loose in one place and then it’s usually enough to use my fingers to remove the whole mold. Having that extra cutting edge area outside of the sculpture means that I never get the screwdriver inside the actual sculpted area, damaging it.


Of course, I also had to make a Klingon head appliance. This one was created for a friend in the US. I tried to come up with a ridge design of my own, and I think I was partially successful. It's hard to come up with something for a Klingon that hasn't already been seen and done.

That’s all for now, children. Next time I'll show a couple of the masks applied to some willing victims.

Monday, May 19, 2008

I hate bloggers! Never ever a blogger myself!!


Yet, here I am now. Somehow I concluded that I have a lot to say but too few listening. So I'll have a go at this blogging business anyway. I'm here to talk about creativity as a lifestyle. I belive that the road to happiness is discovering the meaning of your life, not LIFE in the big, cosmic sense of the word, but you own personal life, that only you can change. If you can pin down what makes you feel complete and accomplished, then you have nothing to worry about. It's as simple as this; What you enjoy doing most = The meaning of your life. For some it's sports, for others it's being social, for me it's being creative as often as I can.

Some facts: Born 1974, living in Sweden. I saw "King Kong" when I was six, and my life hasn't been the same since. I work as an art editor for a local newspaper. In my spare time I write, draw and make masks and props for stage plays, LARP role players and (so far) one TV show. I also make amateur films with my friends and I try to keep the noble art of stop-motion animation alive. I’d like to see the Loch Ness monster perform live before I die. I'm hoping to expand my creativity and finding new friends through it.

That's about it. The stuff that's going up here will be a mix of old and new. Mostly it'll be about what I build for different projects and how things work -or don't. Be seeing ya!