Showing posts with label gorn. Show all posts

Sunday, July 20, 2014

Gorn Masks and Dragon Heads

A few years ago I made a replica of the mask used to portray the monstrous "Gorn" in the classic Star Trek episode "Arena", where he matched wits and brawn with the formidable force of nature known as William Shatner. My Gorn mask was built according to my personal opinions of how the original mask was constructed, as there is very little info on the subject.
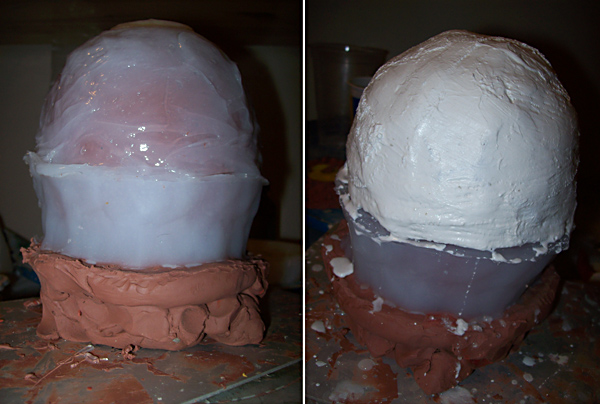
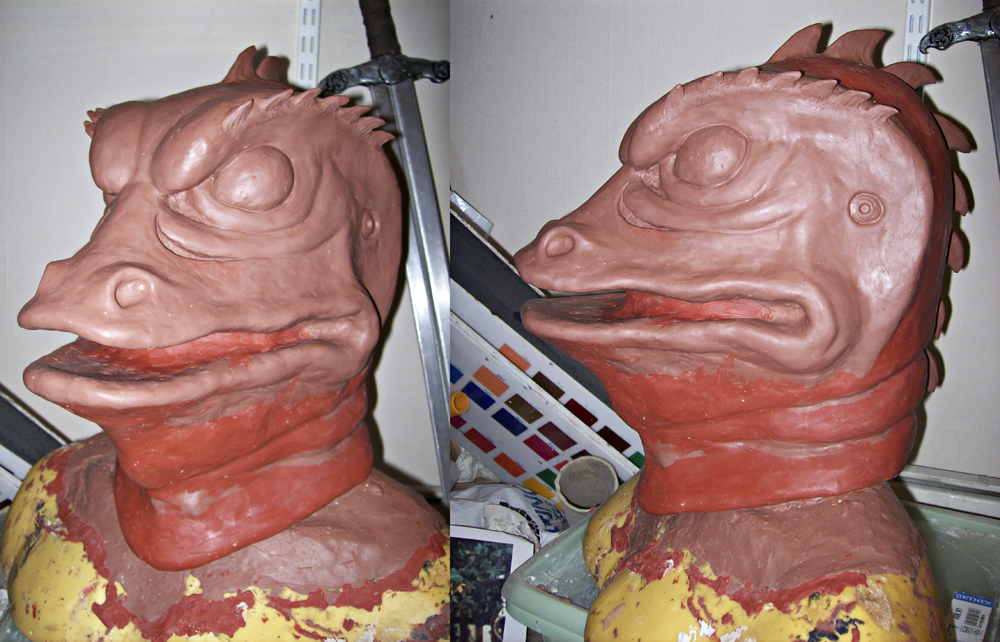
You can read about the making of my Gorn mask here:
http://loneanimator.blogspot.se/2011/09/wrestling-with-gorn.html
The mask was actually eventually sold to Bobby Clark, the stuntman who played the monster. Bobby is now touring Trek conventions displaying my mask as the best replica he's seen, and he should know since he spent several days encapsulated in the hot rubber suit.


Here's Bobby with my mask at the actual location where "Arena" was filmed. I guess that's kind of cool!


Bobby had some reservations about my version, as the original was apparently bigger, and the eyes were covered with glittery sequins. I haven't been able to find any sequins as small as they appear to be in the stills from the episode, but there might've been a sequin of that type in the 1960's. Maybe the Trek costume department had the stuff on hand.


My old Gorn mask seems to be worn out and Bobby contacted me to ask me to make a new copy. Ideally, a new bigger version would've been much better, and I am actually working on that now, but to meet Bobby's convention schedule, a copy of the old version will have to do. So I recently sent a new Gorn mask off to him, along with a plastic baby hatchling. You can read about the making of the Gorn baby here:
http://loneanimator.blogspot.se/2011/09/making-gorn-baby.html
Now, is making copies of monsters someone else has designed and established a fun job? Not really, although it seems to be a popular way of making a name for yourself as a creative person. I see many wonderfully made replicas of the Alien, the Predator, and other famous movie monsters. But  I'd much rather  make my name doing my own thing.
It's surprisingly hard work copying what what's been done before, and the simpler the design, the harder it is to get it right. Just try to draw Donald Duck off the top of your head. I'm trying to do less of this kind of work, though getting an order from an old monster performer is flattering and hard to say no to.


During the past four months I've been juggling four part-time jobs. I wouldn't recommend it, as I came very close to experiencing a burnout. I have friends who have gone through this ordeal, and it's no joke. One of my jobs was building props for the outdoor stage show "The Brothers Lionheart", based on a very popular Swedish children's book. I made plastic helmets, rubber spear tips, and similar stuff, but the main big thing was creating the paw and huge head of the dragon Katla. The production team bought a previously used fiberglass dragon head from another stage show. This head was very poorly detailed, and my job was to build up a completely new surface on it. This entailed mixing sculpted and cast skin pieces with structures built up directly on the fiberglass surface. I actually used a thick acrylic paint mixed with cotton to create Katla's new skin, and the result was a very durable, leathery structure.


Here's the Katla head with a new lick of paint, but still not quite finished.


Katla in action during the show. A smoke gun located in the mouth and nostrils  provided necessary dragon ambiance, along with loud sound effects and dramatic music. Apparently Katla's a success with the audiences.

This is my last stage production. I've made a loooooot of them, starting when I was 13, creating props and masks for a fairy tale show. It's always hard work, but usually there's also lots of fun. Now, the fun seems to have gone out of the equation, and it's just work for me. As success coach Brian Tracy says, "if you're stuck in a job you don't like, get out of that job as you would get out of a burning house." And as the old Klingon proverb goes, "only a fool fights in a burning house."
For the sake of reducing stress and disappointment in my life I've now learnt to use the most powerful word there is: "NO!" Now I say no to all offers of working on stage productions. Instead I'm focusing all my efforts on my personal work, i e my miniature animation work, with occasional props and masks created for my own films, or for projects of close friends. If I can't use my creativity to put joy into my life, then what good is it for? I've no idea if my personal work will ever result in any sort of monetary success, but now that seems unimportant. I'm more concerned with what kind of legacy I can leave behind, and I'd rather realize my own ideas than someone else's. I've heard people say that's a pompous and presumptuous attitude, but shouldn't we believe in our own talents and abilities? Seriously; we must believe that our work comes to good, is important to other people, and is worth every second of effort.

Wednesday, September 21, 2011

Making a Gorn Baby


Kishin of Trekspace and Klingonspace once made a comment about a sequel she had written to the TOS episode "The Trouble With Tribbles". Her story involved lots of Gorn hatchlings running amuck on the Enterprise, which I thought was a funny idea. A Gorn hatchling would be a nice addition to any Trekkie collection, no? In short, this is what I spent my 2010 Easter doing:


I emptied a plastic candy egg and used it as a start for my Gorn egg sculpture. I separated the base from the egg in order to make the casting of the molds easier (read on brave traveller, you'll see what that's about shortly). The egg base was covered with pebbles from my yard to imitate what I imagine would be a nice reptillian egg nest.


The molds for both base and egg, and later Gorn hatchling, were made out of silicone. The egg base was encircled with a clay wall. The silicone was then simply poured in and allowed to find its level.

When the silicone had set, the clay was removed, the mold turned upside down and SmoothCast 325 plastic added to the hollow of the mold.


A different approach was necessary for the egg part. It was turned on its head and stuck in a lump of clay. I didn't need the whole egg, just the lower part. A thin layer of silicone was first poured on the egg sculpture. Two more layers were added with a mix of silicone and thickener. A clay wall stopped the silicone from splashing out all over the place.


When the silicone was thick enough I could remove the clay wall and add a support shell made out of plaster bandages. This will help the elastic mold hold its shape while casting plastic in it.


The egg is supposed to be hollow and perfectly smooth on the inside. This meant it'd have to be "roto-casted". You pour the plastic into the mold and turn it, turn it, turn it, rolling the plastic around along the walls until it starts to set up. This procedure is repeated about three times; Then the plastic shell is thick enough.


And this is the result. The top of the egg is cut and sanded and the two parts joined together.


I painted the egg and the base with acrylic airbrush paints. It's quick and it's possible to add lots of subtle shades this way. I should clean up my airbrush more often.


I didn't know how much of the Gorn baby would be visible while peeking out of its egg, so I decided to sculpt the whole thing. The eyes will be added later as a pair of knobbly buttons, so I just made sure there was enough space for them.


Again; Another approach for making the mold. This time I gradually built up a clay cradle around the sculpture. Eventually I could just pour the silicone into the cradle when it was large enough.


The sculpture came out in bits and pieces. I only had to cut a small bit on the silicone mold to remove all the clay.


The Gorn baby was also roto-cast into a thin plastic shell. Hard polyfoam was then added to make the casting solid, but very light. Another dash with the airbrush and the Gorn is ready for its eyes and its egg shell.


The eyes are plastic buttons painted with metallic spraypaints. They are glued in place with hot-melt glue. I also used this glue to secure the Gorn to the bottom of the shell. I think this project was a pretty suitable pasttime for Easter, just a different kind of egg craft! Are all these materials expensive, you may ask? They're a bit pricey when you buy them in bottles and cans. But they last very long and are quick and easy to use. I made the Gorn hatchling in four days, with a bit of slacking every once in a while.

Wrestling With the Gorn!


I knew the Gorn captain of TOS episode ”Arena” was a tough cookie, having withstood the considerable combat expertise of James T Kirk. I just didn’t exactly know how tough he was until I tried to make my own mask of him. The head of the lizard-like Gorn is a deceptively simple mask. He almost looks like a green, fanged Donald Duck variation. But as I started sculpting the head in clay I realized how difficult it was getting all the details right, and the Gorn head is full of subtle details. The truth is if you don’t understand that and manage to recreate all those details, the Gorn head will look suspiciously wrong in some hard-to-define way. Wah Chang, who created the Gorn head, as well as the salt vampire, the Balok effigy, the ape/pig creature from “The Cage”, the Romulan head gear and battle cruiser, the phaser, the tricorder and pretty-much-you-name-it on TOS, was an endlessly creative man. Besides coming up with great stuff on a very tight budget, he also had a true visionary eye for shapes that would stick in your mind. His Trek aliens and props you remember because of their perfect simplicity and originality. So, nailing down Wah Chang’s Gorn head was no easy task!


Wah Chang’s mask is actually not symmetrical; The right brow ridge is larger than the left, the nostrils aren’t exactly centered, etc. I decided to try and make my mask as symmetrical as I could. There’s very little information about how the Gorn mask worked. Apparently, there were two sets of see-through holes, one just below the frown in the eyebrows and two (pretty obvious) slits below the eyes. Both holes were sculpted into the mask as hollowed-out spaces.


It took a loooong time to get the mask sculpture finished. It kept growing until I ran out of my clay of choice, Chavant. I had to resort to another clay (the redder one) that was a bit too soft for the purpose, but it worked out fine in the end. In order to finish the mask on time for Wonder Con (where it would be displayed by Judith Daniels of alienhair.net) I skipped adding the scales or warts in clay. More about that in a minute.


In order to avoid airbubbles I always brush on the first layer of plaster. I doesn't take care of the problem perfectly, but it certainly helps.


Several layers of plaster follows, including one with burlap dipped in plaster. This is done to add some reinforcement to the plaster mold.


I forgot to add that a dividing clay wall is built up around the mask sculpture. This is done so I can make a two-part plaster mold. When the front half is done I turn the sculpture on its nose and continue to cover the back with plaster. The exposed front half plaster seen here is coated with vaseline. The small round dips you can see in the plaster will be filled out when the back part is made, and will create interlocking keys for the two mold halves. Important stuff, if you want to keep your whole mold together!


When both mold halves are finished and the plaster has been allowed to cool, it's time to part the mold pieces and take out the clay. Screwdrivers are used the pry the mold halves apart. The burlap reinforcements now help keep the mold from cracking.


After having cleaned out the clay, the mold halves were put together and allowed to rest overnight. This is done so some of the moisture will evaporate from the plaster. The insides of the mold halves are then coated with liquid latex. The latex is sponged on in order to reduce airbubbles in cramped spaces. A few coats goes on, including cotton dipped in latex. This will help make big areas, like the nose and the back of the head, sturdy and make them hold their shape. Finally, the mold halves are put together and a few more latex coats are put over the seam between the halves.


After letting the latex set properly I could remove the casting the next morning. There was a bit of "flashing" in the latex casting where the mold halves created a seam. This is alomst unavoidable and the flashing is quite easily removed with a small pair of sharp scissors.


The seam is also covered with sponged-on liquid latex. Now comes the time for adding the bumpy scales. I simply dip a wooden sculpting tool in latex and leave a drop of it on the mask. Then another, and another. This may seem like a deadly dreary job, but it's actully taken care of pretty quickly. It took me about an hour to cover the mask this way. Had I sculpted every bump it would've taken days.


Here the mask has had its first coat of paint applied. I just mixed some latex with different tints and sponged it on. As this paint is latex-based it really bonds with the mask. It also becomes very sticky and can easily attach to itself, which is why I added a liberal coat of corn starch on each section I finished painting.


And here's the finished mask. The teeth were cast in latex from old plaster molds used for creating horns and claws for puppets. The eyes were a bit of a bother. I have no idea what the Gorn's eyes were made out of, and nobody else seems to know either. I settled on making them a sort of insect eyes, with hexagonal shapes covering the surface. The eye was sculpted by pressing an allen key into a clay sphere. Over that I created a silicone mold, in which I could cast hollow plastic eyes. The eyes were then painted with a tough metallic spray paint bought at an auto shop.


Now, I have a pretty big head (perhaps in more ways than one), but this mask was very roomy even for me. When I put it on I could look out through the holes below the eyes; That worked out fine. I had covered them from the inside with a black veily fabric and had no trouble moving around, though quick head moves made it more difficult to see where I was going.


I'm quite happy with my Gorn mask. For a first attempt it's pretty darn good. I may still take another stab at this character eventually. I want to get the eyes just right, for one thing.

So how did things go at Wondercon? Pretty good, actually, as Judith managed to sell the mask to none other than Bobby Clarke, who played the original Gorn! He'd been looking for a decent Gorn mask for sometime, but not really finding anything that met with his standards. He remarked that my mask seemed "small" and that the eyes of the original Gorn were made out of sequins. Other than that he was apparently happy enough with it to buy it.