Showing posts with label john hankins. Show all posts

Wednesday, July 8, 2015

D & D Monsters: Beware the Umber Hulk

While working with our RPG world film, John and I kept adding more and more of that vast menagerie of cool monsters, until we realized that we could go on with the creature encounters without really getting on with the story. Even so, here comes yet another ugly brute!
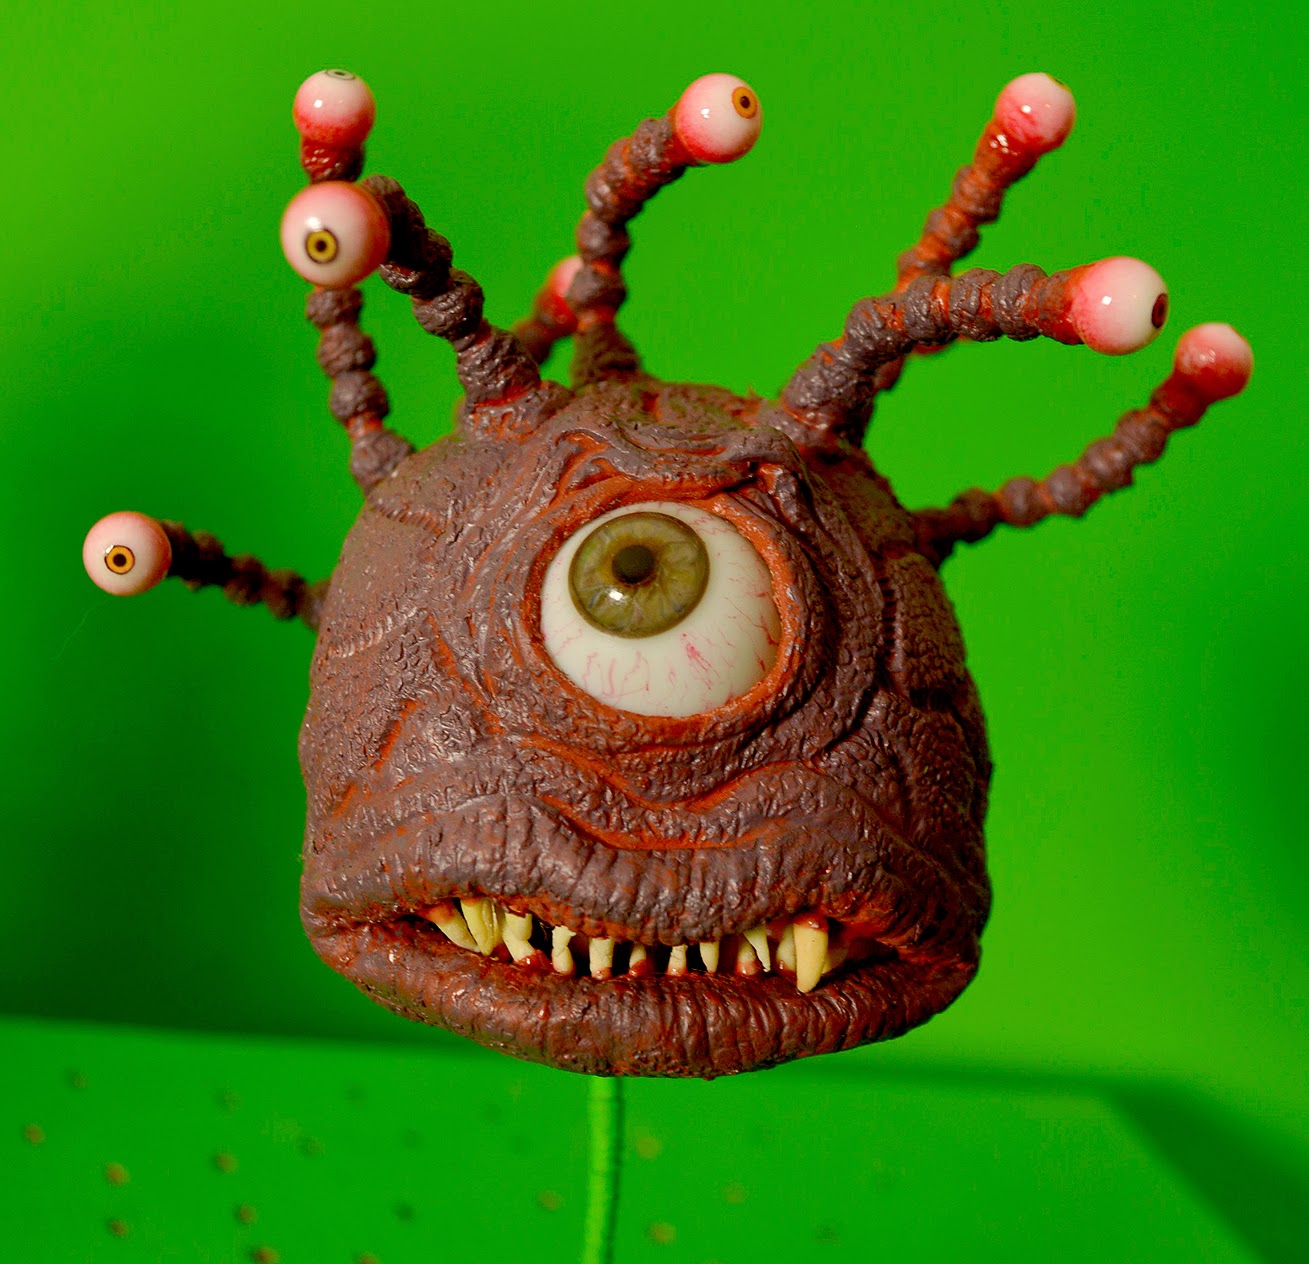
I decided that having these classic monsters and not creating a Ray Harryhausen-style monster brawl between a couple of them would be a sin indeed. Thus the owl bear now makes a second appearance, and encounters a foe to grapple with, namely one of my favourite D & D monsters: The umber hulk.


Again I looked to the original first "Advanced Dungeons & Dragons Monster Manual" from 1977 for inspiration. There, the umber hulk is a slightly comical monstrosity that looks like a cross between a beetle and an ape. It's got two sets of eyes, huge mandibles and a burly body. What's not to like?? In later monster manuals the creature has been given a big makeover, and though it may look cooler in terms of the number of details, I think it has lost some of its charm and personality. My umber hulk puppet would turn out to be a cross between the cherished original concept, and my own added details.


I sculpted the head in Monster Clay, but soon realized that I was making it way too big if it was going to tussle with the owl bear. So I sculpted a new head, which was slightly smaller in size.


As you can see, the smaller set of eyes were small smooth beads, the bigger insect eyes were a pair of plastic buttons with a knobbly surface. I found these, and lots of other buttons suitable for both puppet eyes and other decorations, at a local sewing machine shop.


The head was cast as a loose latex skin from a plaster mould. Limbs were created by bonding together lengths of aluminum wires using sewing string. Friendly Plastic helped merge all the bits. Fingers were made by wrapping thick cotton string around aluminum wires and coating these with tinted latex. I'm thinking of making a stand-alone tutorial on building up hands and fingers, as a few people seem to have issues with this.


The mandibles were really just the one, sculpted in Monster Clay and cast twice in Smooth-Cast 300Q plastic, using a DragonSkin Pro silicone mould. Just before the quick-setting plastic gelled, I lowered a bit of folded aluminum wire into it to create a joint.


More Friendly Plastic was used to hold the mandibles in place from inside the head skin, as well as adding strength to the head. A piece of aluminum wire was also added to the lower lip, to make the mouth open and close in animation.


The armature in itself is, as usual, a straightforward deal. The aluminum wire and Friendly Plastic construction makes it very light weight.


Besides the head, the feet were also sculpted in clay. It's actually just the one sculpture, cast twice in latex. The inside of these latex skins were padded with polyurethane foam and a cotton/latex mix.


Some people seem to have problems finding thick, soft foam to pad the puppet body and create the muscles. As I've mentioned many times before I simply use old cushions and mattresses found at garage sales and donated by friends. But here's another alternative.
I buy thinner sheets of very soft foam used in kitchens to soak up moisture under drying racks. Usually, I use these for smaller puppets, or when I build up bulk on thinner limbs.


But you can also glue bits of this thin foam together. Four bits make up a pretty thick single piece, and you can thus decide exactly just HOW thick you'd like the bits to be. I use a very soft and flexible contact cement to bond the foam pieces. You can also use foam spray glue (which I can't get hold of in Sweden at the moment) or perhaps also rubber cement, which I haven't used in this application.


Here are two examples of the layered thin foam padding. You can create very precise shapes using this method, though it takes a bit longer than using bigger bits.


Here's the puppet with finished foam muscles padding. As you can see, I've used bigger pieces on some parts of the body.


Using older plaster moulds with various skin textures I've created big and small patches of latex skin to cover the foam body. Adding drops of tinted latex helps create interesting textures and patterns.


The finished puppet has received a uniform layer of dark grey using tinted latex drybrushed thinly over the surface of the body. Deeper crevasses have kept their black hue, adding depth and shadow to the character. More drybrushing, using lighter shades of blue grey and reddish brown, adds more details. Both sets of eyes are now covered with transparent scrapbooking liquid plastic.


This puppet ended up slightly larger than I had preferred, but its still workable, and the umber hulk now provides the owl bear with a great wrestling buddy. Play nice, boys!


Wednesday, September 10, 2014

D & D Monsters: The Beholder

Yet another monster for my collaborative (as of yet nameless) fantasy film project with John Hankins. If you're making a film filled with Dungeons & Dragons monsters, you can't do it without the infamous "Beholder"; a floating, gnashing monstrosity, which is more than an awful eyeful.

 Here's how the Beholder was originally depicted in the first "Advanced Dungeons & Dragons Monster Manual" from 1977. There have been much scarier, more detailed illustrations since then, but because John and I are trying to recreate an innocent retro feel for our project, this is the design I based my puppet on.


This is my first rough clay sketch of the beholder, something John and I could discuss. As it turned out we went with this design with very little alterations.


 Here's the finished clay sculpture, executed in Monster Clay. The eye stalks are not there for the casting, as they will be added at a later stage as built-up features. The holes for the stalks are there, however. The big watery eye comes from a discarded mannequin. I added some extra blood veins and covered the whole thing in transparent lacquer.


I cast the sculpture in a two-part mould. It's a slight bit of a hassle, so I don't do this very often. Half the sculpture is walled off with a softer clay simply called "plastellina" here in Sweden, but it has nothing to do with the famous Roma Plastillina sculpting clay. As you can hopefully see I've added three small bumps in the clay wall.These will become "keys" in the plaster mould, helping to interlock the two mould halves.


This is how the two-part mould turned out. Monster clay comes out easily from plaster moulds, but you can see some brown residue from the softer "plastillina".


Ordinary liquid latex is tinted with universal tinting colours and dabbed onto the inside of the plaster mould halves with a sponge. Four layers of latex was added this way to build up a sturdy, but not too firm latex skin. I went with a rust red/brown hue, which will form a good base for the additional layer of colour going on when the whole puppet is finished.


Here's the important detail, though. The insides of the latex puppet halves are lined with thin sheets of foam rubber. This will add support without making the latex skin too leathery and still allowing some stretch.


A plastic bottle screw cap becomes a cheap but effective eye socket for the glass mannequin eye. Friendly Plastic thermoplastic holds the cap in place, allowing the eye to swivel freely. I've also added the first two eye stalks, held in place by the plastic.


The two body halves are now joined together with contact cement, and the join is covered with more tinted latex. A thick but bendable aluminum rod has been added to the screw cap using more Friendly Plastic. This rod is a support to keep the "floating" puppet aloft while being animated. I've covered the rod with soft string, which will ease the application of the green screen paint, which will be added later. I've also added a looping piece of string wrapped aluminum wire to the insides of the lips.
 

The eye stalks are aluminum wires covered with soft string, and then tinted latex. The eyeballs are plastic balls used to make "pearl" necklaces. I've ground down a flat area on top of each ball, where a printed photoshopped iris image has been added. The eyeball is then covered with Glossy Accents, which is a transparent, slightly rubbery air drying plastic used by scrapbookers.


Time for teeth! These are simply made by mixing latex with cab-o-sil (fumed silica), which creates a butter-like latex paste. Rolling this paste between your thumb and index finger will create small, pointy, flexible, bone-white bits, which dries quite fast in normal room temperature.


The teeth are stuck to the mouth using tinted liquid latex, and the hole in the puppet's bum is covered up with a cast latex skin patch. The inside of the mouth is created by contact cementing two pieces of thin urethane rubber to the inside of the mouth cavity above the lips, and covering these with cotton shapes and tinted latex.


To finish the puppet a thin layer of purple PAX paint is sponged on over the puppet, taking care not to over apply and cover up the various wrinkles and crevasses on the puppet body.


Hopefully, John's encounter with the Beholder will look something like this. Beholders are among the "boss" creatures of fantasy gaming, so they're not just ugly; they're smart too. They're also able to fire various nasty energy emissions from their eye stalk eyes, so it's a meeting between hero and monster full with exciting possibilities!

Wednesday, August 13, 2014

D & D Monsters: The Rust Monster

Continuing with my collaborative video project with John Hankins, next up is this critter, which is really one of my favourite monsters in the world: The so-ugly-it's-cute rust monster. This creature will strike at your weapons or armour, making them corrode instantly so the monster can feast on the rusted remains.

The image to the left is the rust monster I grew up with; the illustration from the legendary 1977 "Advanced Dungeons & Dragons Monster Manual", complete with wacky propeller at the tip of its tail. The one to the right is the more recent, anatomically believable concept, perfect for a movie creature. Which is why I'm not using it. I'm going with the original version, and am making very few excuses for its cartoonishness when building the puppet.

D & D also released a line of hard plastic miniature monsters, of which I have a few since childhood. Among these is the rust monster. I had it sitting on a shelf next to me while building the rust monster puppet, mainly as inspiration rather than an exact guide.


I sculpted the main body in Monster Clay. This would become a shell cast in two pieces, under which the limbs would be attached. The eyes are plastic albino mammal eyes bought from a taxidermist supply shop.


Here are the two main body pieces cast in latex with a latex/cotton reinforcement. You can see some of the cotton sticking out from under the belly piece.


To add extra sturdiness to the shell parts I mixed the extremely fast-setting OOMOO plastic from Smooth-On, and poured it into the latex skins, creating a very hard interior, but keeping a leathery exterior.
The antenna are aluminum wires wrapped in soft cotton string, and dabbed with tinted latex. I use liquid universal tinting colours to dye my latex. They're a bit pricey, but last forever, as you only need a drop for each batch of latex. The eyes are glued in place with flexible super glue.


I already had an old plaster mould for a wrinkled, muscular tail or tentacle, made for a previous project. I covered a bit of aluminum wire with soft string, soaked that in latex, and pressed it into the plaster mould. I wrapped the latex skin around the tail, and used liquid latex to cover up the seam. The tail propeller (or whatever it's supposed to be) is a piece of cardboard covered in latex.


The limbs are starting to grow out of the rust monster. They're all attached to the plastic inside shell using Friendly Plastic thermoplastic. I've also added a jointed lower jaw with two latex tusks.


Using small bits of soft polyurethane foam the muscles are built up over the legs with flexible Casco contact cement, and then covered with latex skins. The legs are given a thin coat of tinted latex.


Finally, a thin layer of PAX paint (acrylic tube paint and ProsAide No-Tack make-uo glue) is sponged on. This creates a very good surface for Liquitex acrylic airbrush paints. A thin coat of transparent acrylic primer goes on lastly.


And here's the finished rust monster on my animation stage. I'm hoping he'll be a treat to animate!


A Photoshop mash-up of John as the intrepid questing hero, who is apparently unaware that swords and rust monsters are a bad combo!