In my last post I talked about a caveman comedy, featuring two guys that were a part of a special
needs people media project I worked on a couple of years ago. I also included a shot from the film featuring an animated character. The puppet in
question is one of those terror birds, the huge flightless monster
birds that appeared after the extinction of the dinosaurs. I decided
early on that this film wouldn't have any dinosaurs in it, but rather
primitive mammals and other creatures of that age, which are not featured very often in films.
As
per usual I'm using monster clay medium grade to sculpt the head,
adding bits and taking away bits using loop tools. I actually can't
recommend this material enough. It's the most versatile sculpting
material I've ever used, and works well for both small and big
sculpts. As you can hopefully see I've sculpted the mouth slightly
open, and this is so I can cast the whole head, including the jaw, in
one piece, having the edges of the insides of the beak slightly
visible, which will create a better-looking mouth than sculpting the
beak closed. Having the whole head in one piece allows me to control
the overall look of it.
In the case of this sculpture I've added
slightly drooping corners of the mouth, which adds a permanently
scowling or frowning look to the puppet. Because it's a grumpy bird!
Small plastic beads stand in for the eyes. I'll simply paint on the
eyes on this puppet and the glossy surface of the bead will create a
smooth area in the cast latex head, which is perfect to paint eyes
on.
Jumping
ahead a bit, I've built up a plaster mold and the clay has been
cleaned out of it. I'm adding drops of tinted latex using a pipe cleaner as a brush to get the liquid into all areas of
the mold. I'm adding three layers of latex, and then another layer of
latex and cotton to most areas. In fact, the only parts not covered
with the cotton/latex mix are the corners of the mouth. And after
some pulling and prying the cast latex head skin finally comes out.
I'm using a very sharp, pointy-nosed pair of scissors to cut away the
excess latex in the mouth and around the head.
As you can see in this photo I've added a horn to the head to make the bird look even more exaggerated and primeval. The horn was also sculpted in clay and cast as a separate latex piece. The armature is my usual bundle of aluminum wires, held together with crochet yarn and Polymorph thermoplastic. The screw at the back shows where a flying rig can be attached to make the bird jump when animated.
The legs and neck are covered with thin polyurethane foam, though I did remove the foam around the neck when I noticed that it would look too bulky when the "plumage" was added on top of it.
This bird actually has no real feathers at all, but is instead covered by fur from an old fur hat. I figured I might just get away with that look.
The finished bird puppet is airbrushed over the furry sections, but the same acrylic paint has been hand painted onto the latex parts for a more detailed look. The claws on the feet are cotton dipped in latex, and shaped by being rolled between my thumb and index finger.
Soon to come are the other two caveman-era monsters, but you'll have to wait and see what sort they are :)
In the summer of 2016 I shot the live-action footage for a caveman comedy, which then went through extensive editing because of a faulty microphone and because I almost over-reached when I got to the FX work. But now it's finally looking like near completion, so it's time to start sharing the work on this project with you.
These two happy chaps are our heroes, from left to right, Andreas Pettersson and Joakim Strömgren. They were participants in a media project aimed at people with slight disabilities, for which I worked the better part of three years. Both of them have slight mental disabilities (and Andreas is almost blind in one eye), but they're quite independent and far less glum in their outlook on life than I usually am. Eventually this project ran its course, and nobody stepped in to finance or take over it, so it quietly died. However, by this point Andreas had bought his own camera and editing software, and started making his own short videos. I wanted to stay in touch with Andreas, Joakim and others from our group, so I concocted this film to keep working with them.
The story is basically about the invention of the wheel, and the ensuing problems. As usual I shot the whole thing in front of a green screen, but outdoors. The weather was fine up until the very last shot, after which it started to pour down.
Despite using this pretty primitive set up, I'm quite happy with how the composits in After Effects turned out. All backgrounds are pieced together in Photoshop using stock images. I used a warm filter to unify the final compositions.
The costumes are as plain as they can be. I bought two fur coats at a garage sale and cut them up to look like the traditional cartoon caveman garbs. I bought three cheap wigs online (the third comes into play in one part of the story), and the other props plus some stone age jewellery were culled from previous projects. You might wonder what the heck is going on in the photo above. Well, keep reading..
This arrangement is supposed to represent the intrepid inventors trying out the wheel for the first time. Joakim and Andreas are sitting on a couple of bar stools, draped over with a green screen. Apart from the legs of the stools disappearing down holes dug by the numerous moles that infest my garden, the set up worked quite well.
The actual locomotion of the venture is supposed to represent a circus act of a kind. It's not exactly a perfect effect, but the general idea seems to be communicated. Andreas right leg disappeared behind the green screened stool, so the right leg used in these shots is actually mine, shot separately and added in its own layer in AE.
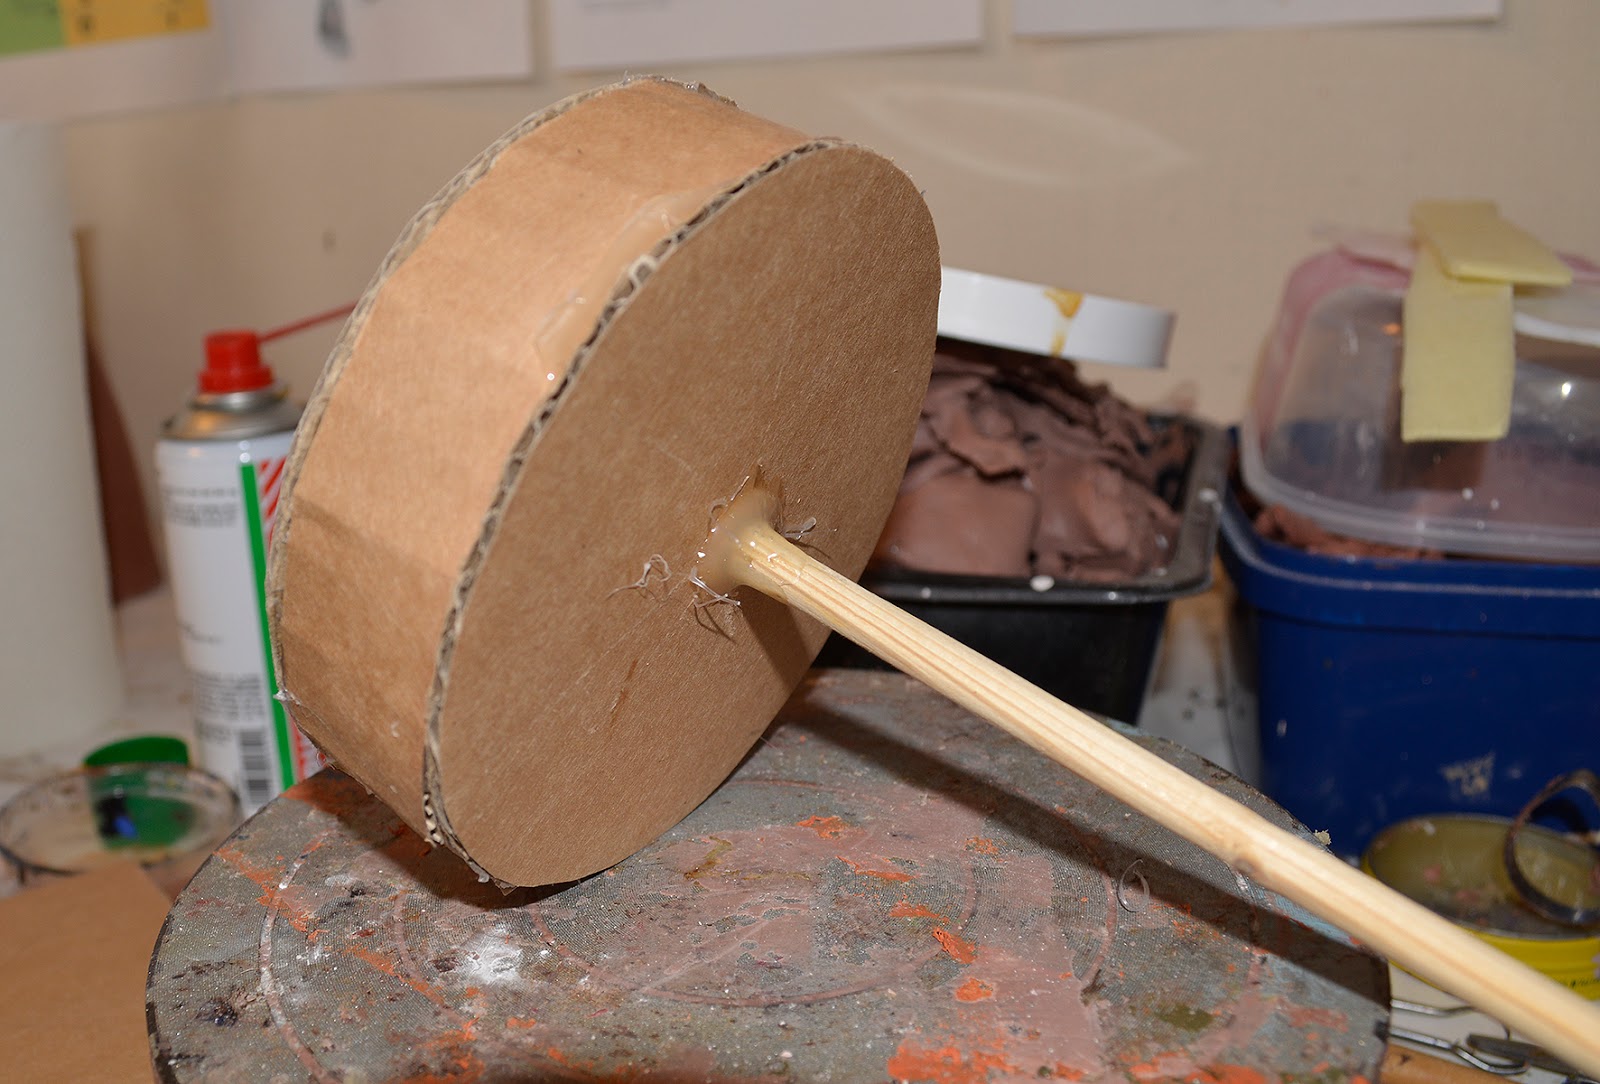
The wheel is a real low-tech construction: Some bits of cardboard glued together and covered with a mix of latex and cabosil, painted grey. A wooden rod is attached to the backside, and I simply spin the contraption with my fingers in front of my camera, backed by a green screen.
This is what a final shot can look like. As you can see they're chased by a stop-motion bird, but there will also be other prehistoric critters in this film. No dinosaurs, though. I opted for slightly cartoonish post-dino creatures instead, since they're hardly ever represented on film.
In my coming posts I'll detail the making of these puppets, as per usual. Andreas and I are actually starting up a new group project for disabled people, where we'll focus on making short films. We have some valuable support from a Swedish educational organization, and later this year I'll be reporting about our escapades there. I'm sure it won't surprise you that there'll be some stop-mo critters appearing in those videos too.
You are correct; this is a very late seasonal greeting, but better late than never, I guess. This poem was first published as "Yuletide Horror" in Weird Tales December 1926, but has since then been included in various anthologies, mostly under its original title "Festival."
The critter at the end of the video is one of my favorite Lovecraftian monsters. It first appeared in Robert
Bloch's excellent short story “Notebook Found In a Deserted House”. Here's how it was
illustrated by Matt Fox in the May issue of Weird Tales 1951. As you
can see it's depicted as a quite traditional devilish creature, but
with lots of limbs and mouths, as described in the tale.
It's actually described as
a shoggoth in the story, but when gaming company Chaosium included
various Lovecraftian monsters in their products they dubbed this
creature a Dark Young of Shub-Niggurath instead, and they gave it
it's now iconic look of an amorphous body, with stumpy hooved legs.
Pretty much as Bloch envisioned it.
Now, I've been wanting to
build and animate this monster for a few years and I actually made a
set of hooves about four years ago. I sculpted them in Cahavant clay
and then cast them in SmoothCast 365 plastic from one silicone mold.
The three hooves are hollow, and to attach them to an armature I've
drilled holes in the top of each hoof.
Starting off with the
legs, they are as usual made from a few strands of aluminum wires,
sectioned off with short steel nails held in place with yarn
wrappings. This creates small joints between the nails that allows
the legs to be animated in any direction. So why not simply have the
wires without the nails? These legs will be like small octopus arms
anyway. The nails actually helps the legs become sturdier, and the
joints between them less bouncy and jiggly. In other words, the
animation will be easier to perform. The finished leg
armature goes into the top of the hoof and I'm using melted polymorph
plastic to fix the armature to the inside of the hoof.
It's time to add the
actual tie-down function to their undersides of the hooves. I'm filling up each
hoof with a fast-setting plastic called Rhino, and before the
material cures I'm adding a t-nut with a screwed-in bolt to create the
tie down. The t-nut has a longer threaded canal than the wing nuts I
usually use, and will therefore take a greater weight and add more
stability to a puppet during the animation. Since this puppet will be
larger than what I usually build, this was a sound solution. I simply hold the t-nut in place while the plastic sets. I need a
screwdriver to get the rod unstuck from the plastic, but when I use
it during animation to clamp down the puppet on the animation stage I
can add and remove the rod with my fingertips.
The legs have been fixed to a ring made from steel wire, covered with Polymorph plastic. This will later be attached to the rest of the puppet armature.
These aluminum wires will
become the crown of tentacles on top of the dark young. I've ground
down the rather thick wires in one end so they become very slim and
pointed there, and the other end is twisted into a loop for attaching to the leg armature part.
I'm covering all of the
tentacle armatures with a wrapping of thick yarn. No nails or other
reinforcements are added, as the tentacles won't be carrying any
other weight than their own. The yarn is soaked in a couple of layers
of tinted latex. And I'm using my heat gun at a low setting to speed
up the drying process.
This potato-like blob is
a chunk of medium grade monster clay, into which I've stuck the
finished tentacles. I could've built up the body of the puppet using
cotton and polyurethane padding, covered with patches of latex skin,
but I decided to sculpt it instead, which allowed me to add more
organic details that seemed to flow into and out of each other. I'm
mostly using loop tools to create the wrinkly and warty shapes on the
skin.
Here's the finished sculpture, ready to have a plaster mold created around it. Half-pearls or sequins, if
you will, are added as eyes into the sculpture. As I'm sure you know
by now I use these scrapbooking items as cheap eyes on many of my
puppets. They're very effective as they reflect light aimed at them,
and appear to be glowing. To smooth out details I use stiff oil
painting brush dipped in Vaseline.
The first layer of plaster
is carefully brushed on. I go over the surface of the sculpture many
times to ensure there are no air pockets. You can see that I've added
a short wall of clay around the base. This is so the plaster won't
run out all over the turntable.
After this first layer I'm
building up that clay wall to completely cover the height of the
sculpture. This allows me to simply pour in the rest of the plaster
and let it rise to fill this clay shell. I could've added several
layers of plastic one at a time, but this is much faster.
I'm casting the body of
the puppet as a skin made from tinted latex. I'm pouring in a small
batch and painting the latex into all areas using a q-tip. I'm adding
four layers of latex, allowing each layer to dry properly before
adding the next. When the latex has cured I powder it with talcum and
pry it loose from the mold.
I cut holes in the latex
where the tentacles will be attached and where the eyes will be put
in. I'm actually using a bit
of very strong chroma key gaffer tape to stick the eyes to the inside
of the latex skin. The tape will flex with the skin and still keep
the eyes in place.
I have sculpted a bunch of
open mouths into the body. To be able to animate those I'll have to
add some aluminum wires to the inside of the rims of the mouths. I do
that by wrapping some aluminum wires with soft string, helping it
stick with a dab of contact cement. When the string wrapping is
complete I cover it with latex, and the wire can now be turned into a
loop. As you can see I've left the ends uncovered. This is so I can
join them together using super glue and baking soda, which when mixed
will turn into an incredibly hard and durable material. I add some
more string and latex to this uncovered bit, and we have a mouth
armature which can be animated folding and opening in any funny
direction. Each mouth armature is glued to the inside of the latex
skin using liquid latex as a bonding agent.
The latex-covered yarn on
the tentacles does add some texture, but I want something the looks
softer and a bit more sculpted, so I'm casting some latex into old
skin mold with a very wrinkly look. When these patches of latex have
dried I peel them off the mold, dab them with liquid latex and wrap
them around the tentacles. I'm also adding some drops of latex to
create warts and bumps on the skin.
With all tentacles
finished it's time to add them to the body. I cover the area where
the tentacles go into the body skin with latex and bits of cotton,
and use the heat gun to make the latex cure faster. This will fix the
tentacles to the body skin. When that's done I add melted Polymorph
plastic to the inside. This will fix the tentacles to both the latex
skin and to each other. The teeth are small bits of latex simply
rolled between my fingers until they harden as tiny pointy bits.
These teeth are glued in place using liquid latex which permanently
makes them a part of the body skin.
The legs get wrapped with
thin polyurethane foam until I get the desired look and thickness.
The seam between plastic hoof and foam is covered with cotton soaked
in latex. I'm using more contact cement to make sure the cotton stays
in place. Like the tentacles, the legs are covered with patches of
latex skin cast in a wrinkly skin mold.
To pad out the bottom of
the puppet I'm cutting out a couple of bits of camping seat cushion,
and gluing them together using contact cement.
I wanted the underside to
be warty and weird-looking, so I turned to my little cookie box of
surplus castings I've made over the years. If you keep latex castings
dark and pretty airtight they will last for quite a while. So every
time I've made castings but not used all of them they go into this
little box. These patches of warty skin are stuck in place using
latex. Since the seat foam on the underside is slightly porous it'll
accept the latex and bond with it.
The puppet gets a thin
covering of tinted latex to help unify the various added bits. Then I
go over it all with an airbrush and acrylic paint with highlights and
added colors.
It would've been great fun to actually adapt "Notebook Found In a Deserted House", but that story is copyrighted, and the estate of Robert Bloch is probably not to be trifled with. Nor is Chaosium, but I think my use of this monster is within the "fair use" appreciation.
This project started way back in 2014, but now it's finally finished. I made a few puppets inspired by the original 1977 Advanced Dungeons & Dragons Monster Manual, and they're all covered in previous posts on this blog. Here are links to all of them:
Some people have been telling me for years to make a YouTube Halloween video, and this year I finally made one. I spent a week on the project, and used mostly older puppets, but a few unused ones snuck in there too. Here's the video:
But I managed to make two new puppets. Here's the first one.
This is actually a quite old latex cast I found in one of my stashes of stuff-I-should-throw-away-but-never-does. Originally it was supposed to be a Mewlip (featured in my Mewlips video), but I decided to go in another direction with these creatures and discarded this design. However, I had already cast this latex skin and added the two reflective bead eyes. Since the skin was in good shape despite the years (latex will, as you know, start to crumble after some time) I decided to use it for one of my new Halloween puppets. I added sheets of polyurethane foam on the inside of the skin, using liquid latex as a bonding agent, to bulk it up a bit.
I also bulked up the aluminum wire armature with some foam wrappings. Cotton and latex was used to build up muscles on the lanky arms, and a pair of latex wings were attached to the back of the armature. You can see the whole wing-making process HERE.
Here the puppet has been given a skin made from patches of latex skin cast in plaster molds. The nails are made from thick paper dipped in latex.
And here's the finished puppet. I also placed a wing nut in the puppet's posterior, so I can attach a flying rig.
Here's the second original puppet in this video. It's a lanky, pot-bellied zombie with a slightly (or maybe very) cartoony look. Like with the other puppet I had already sculpted the torso and created a mold for it. I can't actually remember what I made the sculpture for, but I thought it would fit right in here, and it did. As you can hopefully see in this photo the cast latex skin has been padded with thin sheets of polyurethane, and the armature has also been padded in the same way. Also, this guy has a wing nut in his butt.
These two puppets are very simply and quickly made, but perfectly functional in every way. What cuts down the construction time in this case is that none of the puppets have articulated faces. No rotating eyes or jointed jaws.
The finished goofy zombie. Both these guys flut past the camera so quickly it'd be a waste to just use them once. No idea what the future holds, but I'm sure you haven't seen the last of them.