Monday, September 26, 2011

Umibozu: The finished Short Film

That's interesting: I've always been able to imbed a videoclip from YouTube here, but not this time! Never mind; Here you go:

http://www.youtube.com/watch?v=-pz64iwUwIs&feature=channel_video_title

Sunday, September 25, 2011

Swedish-Japanese Monster Attacks: Umibozu!

Now for a little short film project. Long ago I found a Japanese story about the sailor Tokuso encountering an Umibozu at sea, and discussing the peculiarities of life, horror and truth with the monster.

An Umibozu is said to be the spectre of a drowned Buddhist monk, and usually manifests itself as a huge black head, on occasion accompanied by tentacles. The creature is huge and sinks ships daring to venture too far off the coastline. Of course, a giant squid comes to mind, and it has been suggested that such an animal have been glimpsed and the encounter started off the legend.


  My version of the story features a poor fisherman, rather than a successful mariner. The Umibozu is pretty intact, and has a couple of nasty-looking tentacles.


In early September I shot some green screen footage of my pal Dag Persson dressed up as the fisherman. We concocted a very simple wooden hold for the "oar", which was just a big stick in reality. I took some snapshots of a small wooden japanese boat model a friend of mine has, and superimposed Dag into it. It works fine for distance shots, while close-ups simply show Dag from the waist up. We used a powerful leaf-blower (which made a hell of a racket) to simulate stormy winds. Dag's been in a few of my projects. He was the hero in my "The King Who Sought Immortality", for which he also stood in front of a chroma key screen with the leaf-blower going full blast in his face.


The Umibozu itself was constructed as a very plain hand puppet, just something I held aloft on my outstreched arm and waved around in front of the camera. Since it wasn't meant to convey any expressions I tried to create a distinct permanent expression on the sculpture for the puppet.


I made a two-part plaster mould for the sculpture and cast latex tinted black into the finished mould.


The finished puppet has reddish eyes created by painting on the flat backside of a pair of glass semi-orbs. I also made a jointed latex tentacle, which I animated twice and edited into the shots of the Umibozu submerged in water.


The finished shots make use of photos of an overcast sky, googled lightning images, shots of a CGI ocean I bought some years ago, and some spark shower footage from detonationfilms.com used as water splashes.


It's not a realistic look, but that's not what I was after. The whole film is stylized in different ways.


For example, I chose to include fleeting images of some of the words from the conversation between the monster and the fisherman. The reason for this is simply to add more punch to the visuals, and also to make sure our Swedish-accented English comes across well enough. If you can't understand what's being said, the purpose of the film kind of falls flat.

I'm still editing the project, but it should be up on YouTube during the coming week. Sayonara!

Friday, September 23, 2011

Puppets by Request: Kong and the Cyclops

I am asked more and more often to make puppets for other animators, which is fun, but also steals time from my own projects. At the same time it's interesting to try and recreate the look of classic movie monsters. It's a lot harder than I initially thought.
Right now I'm working on a on a King King puppet, which will be just under a foot tall. As you may know, that is smaller than the original 1933 puppet by Marcel Delgado. The client sent me a ball and socket armature that he used for another puppet a while back. I modified this armature and will be using it for Kong.


I've done two face sculptures; One slightly rounded, which is the one I've picked for this armature, and one slightly elongated and a bit bigger. Right now the head I prefer has red "eyes". I touched them up in a few images to get a better look at what they might look like finished. Also, the teeth are just put there for a quick look.


 Also, you might recognize this fellow, which is being made for another client:


Again, the teeth are just there for show at the moment, and the eye will, of course, be replaced with a realistic one.

Making a Klingon skull (just for fun).


Last year I made a Klingon skull, which I thought might look pretty fancy in my DVD shelf (and it did). And let's face it; What would your rendition of Klingon "Hamlet" be without it?? I've done skulls used as props in stage shows before, so making the actual skull was no news for me, except for the fact that it was going to be slightly bigger than an average human skull.


I almost always start off with a sculpture made in Chavant clay. This clay is oil-based and used by the US car industry to sculpt prototype car bodies. But you can buy it at many retailers of ceramics materials and sculpture houses. The thing about Chavant is that it's pretty compact and hard when you start off working with it, but the body warmth from your fingers eventually makes it more and more pliable. But if you don't have the patience to wait for that (like me), you can make it instantly soft by warming the Chavant with a heat gun. If you warm it long enough the clay will go into a completely liquid state, so be careful. Warming the clay is good for getting bigger chunks of it soft, so you can clump them together to get your sculpture started. After having worked for a while on the clay blob with loop tools it started to resemble a skull. I used a book with really good images of a human skull as reference.


After about two weeknights worth of sculpting I was pretty satisfied with how the skull turned out. I tried to come up with my own ridge design, but I probably unconsciously nicked it from somewhere. I made a very lazy underside with hardly any details, but those can be added later as separate casts.


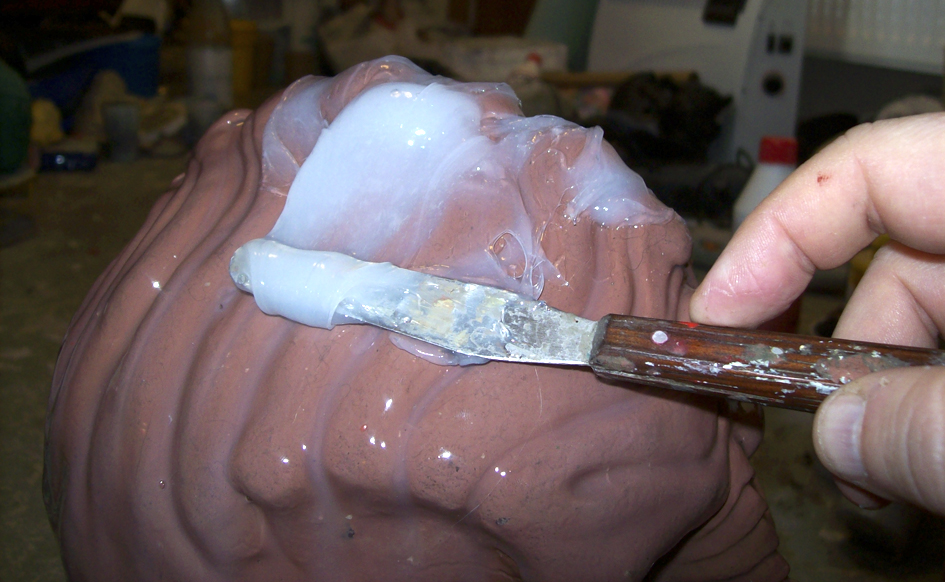
This sculpture is getting a mold made out of silicone, which is a good material since you can cast almost everything in it. I use a silicone called DragonSkin Q manufactured(?) and sold by SmoothOn Inc. What's good about this particular brand is that you can measure up the two components in plastic cups without needing any scales. You just measure by eye two equal parts and mix them together. The DragonSkin Q sets in about 8 minutes and is fully cured in 75. I always brush on the first layer to avoid airbubbles. Some always sneak in, but the brushing helps keep them down. Use a really cheap brush, `cause after you've dipped it in silicone it goes off to brush heaven.


After this first layer I add up to five layers of silicone with a thickener added. This makes it easy to just slap it on like butter.


I also add some tints to each new layer of silicone, so I know I've covered all surfaces.


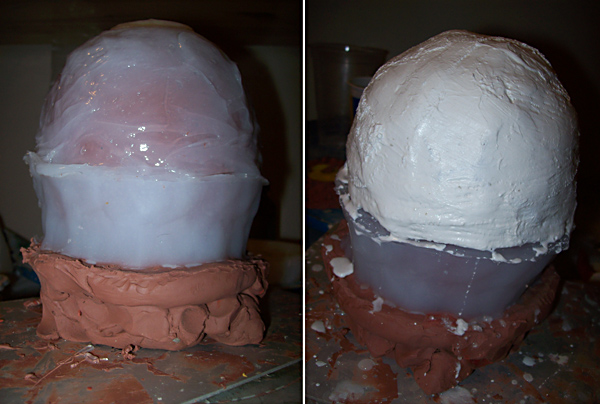
I like to add a support shell to some part of the silicone mold. If I don't it'll just flop around in my hands when I try to cast something in it, since the silicone is so soft. The nasty-looking stuff I'm mixing here is another SmoothOn product called Shell Shock, which is a brushable plastic.


I just ladle it on thickly over the back end of the skull mold. I put the mold on a black trash bag, since the plastic is pretty drippy. If I hadn't had any Shell Shock at home I would've used plaster bandages, which works almost just as well too.


When I'm casting in the silicone mold I'll put it into its plastic "cradle" first, which will help the silicone mold stay put in its shape until the material cast inside the mold have cured.


The silicone mold is so soft the sculpture comes out pretty intact. Only some of the teeth have fallen off.


I've cut a hole in the slit on the underside, where I'll pour the casting material. Time for more SmoothOn product placement! I'm using one of their plastics called SmoothCast 325. Like all the other stuff you mix two parts 50/50 and pour it into the mold. I've also added black pigments; If I hadn't, the plastic would have turned semi-transparent amber (which can be cool, but not for this project). I realized I actually didn't have enough plastic at home to make a strong enough casting, so I reinforced by pouring in Foam-it, which is a rigid polyurathane foam. It's very light but very hard.


Here's the finished plastic/foam cast pulled from the silicone mold. You can see the yellow foam shine through here and there.


You can swab down your casting with alcohol if you want to remove all traces of oil from the silicone, but I've never had any problems with DragonSkin molds, so I just go straight to priming it. Sometimes I use auto primer in a spray can, other times I use a transparent airbrush color primer (like I did now). It helps the paint stick better and I usually finish my paint jobs by spraying primer over the whole thing as a sealer.


A mix of white and earthy brown acrylic airbrush paints are sprayed on, and a thin layer of brown and yellow are added over that with some brown shading.


And there you go. If you want even better results, go out in your garden and rub some dirt over the skull; it actually takes any shine from the paint job off and adds unmistakeable details of age and wear. If you don't want to go through the hassle of molding and casting you can buy a plastic skull replica and build the Klingon features up with plumber's epoxy putty, making your sculpture and finished prop in one. Of course, having a mold means you can make copies of your skull :)

Wednesday, September 21, 2011

Making a Gorn Baby


Kishin of Trekspace and Klingonspace once made a comment about a sequel she had written to the TOS episode "The Trouble With Tribbles". Her story involved lots of Gorn hatchlings running amuck on the Enterprise, which I thought was a funny idea. A Gorn hatchling would be a nice addition to any Trekkie collection, no? In short, this is what I spent my 2010 Easter doing:


I emptied a plastic candy egg and used it as a start for my Gorn egg sculpture. I separated the base from the egg in order to make the casting of the molds easier (read on brave traveller, you'll see what that's about shortly). The egg base was covered with pebbles from my yard to imitate what I imagine would be a nice reptillian egg nest.


The molds for both base and egg, and later Gorn hatchling, were made out of silicone. The egg base was encircled with a clay wall. The silicone was then simply poured in and allowed to find its level.

When the silicone had set, the clay was removed, the mold turned upside down and SmoothCast 325 plastic added to the hollow of the mold.


A different approach was necessary for the egg part. It was turned on its head and stuck in a lump of clay. I didn't need the whole egg, just the lower part. A thin layer of silicone was first poured on the egg sculpture. Two more layers were added with a mix of silicone and thickener. A clay wall stopped the silicone from splashing out all over the place.


When the silicone was thick enough I could remove the clay wall and add a support shell made out of plaster bandages. This will help the elastic mold hold its shape while casting plastic in it.


The egg is supposed to be hollow and perfectly smooth on the inside. This meant it'd have to be "roto-casted". You pour the plastic into the mold and turn it, turn it, turn it, rolling the plastic around along the walls until it starts to set up. This procedure is repeated about three times; Then the plastic shell is thick enough.


And this is the result. The top of the egg is cut and sanded and the two parts joined together.


I painted the egg and the base with acrylic airbrush paints. It's quick and it's possible to add lots of subtle shades this way. I should clean up my airbrush more often.


I didn't know how much of the Gorn baby would be visible while peeking out of its egg, so I decided to sculpt the whole thing. The eyes will be added later as a pair of knobbly buttons, so I just made sure there was enough space for them.


Again; Another approach for making the mold. This time I gradually built up a clay cradle around the sculpture. Eventually I could just pour the silicone into the cradle when it was large enough.


The sculpture came out in bits and pieces. I only had to cut a small bit on the silicone mold to remove all the clay.


The Gorn baby was also roto-cast into a thin plastic shell. Hard polyfoam was then added to make the casting solid, but very light. Another dash with the airbrush and the Gorn is ready for its eyes and its egg shell.


The eyes are plastic buttons painted with metallic spraypaints. They are glued in place with hot-melt glue. I also used this glue to secure the Gorn to the bottom of the shell. I think this project was a pretty suitable pasttime for Easter, just a different kind of egg craft! Are all these materials expensive, you may ask? They're a bit pricey when you buy them in bottles and cans. But they last very long and are quick and easy to use. I made the Gorn hatchling in four days, with a bit of slacking every once in a while.