
Last year I made a Klingon skull, which I thought might look pretty fancy in my DVD shelf (and it did). And let's face it; What would your rendition of Klingon "Hamlet" be without it?? I've done skulls used as props in stage shows before, so making the actual skull was no news for me, except for the fact that it was going to be slightly bigger than an average human skull.

I almost always start off with a sculpture made in Chavant clay. This clay is oil-based and used by the US car industry to sculpt prototype car bodies. But you can buy it at many retailers of ceramics materials and sculpture houses. The thing about Chavant is that it's pretty compact and hard when you start off working with it, but the body warmth from your fingers eventually makes it more and more pliable. But if you don't have the patience to wait for that (like me), you can make it instantly soft by warming the Chavant with a heat gun. If you warm it long enough the clay will go into a completely liquid state, so be careful. Warming the clay is good for getting bigger chunks of it soft, so you can clump them together to get your sculpture started. After having worked for a while on the clay blob with loop tools it started to resemble a skull. I used a book with really good images of a human skull as reference.

After about two weeknights worth of sculpting I was pretty satisfied with how the skull turned out. I tried to come up with my own ridge design, but I probably unconsciously nicked it from somewhere. I made a very lazy underside with hardly any details, but those can be added later as separate casts.

This sculpture is getting a mold made out of silicone, which is a good material since you can cast almost everything in it. I use a silicone called DragonSkin Q manufactured(?) and sold by SmoothOn Inc. What's good about this particular brand is that you can measure up the two components in plastic cups without needing any scales. You just measure by eye two equal parts and mix them together. The DragonSkin Q sets in about 8 minutes and is fully cured in 75. I always brush on the first layer to avoid airbubbles. Some always sneak in, but the brushing helps keep them down. Use a really cheap brush, `cause after you've dipped it in silicone it goes off to brush heaven.
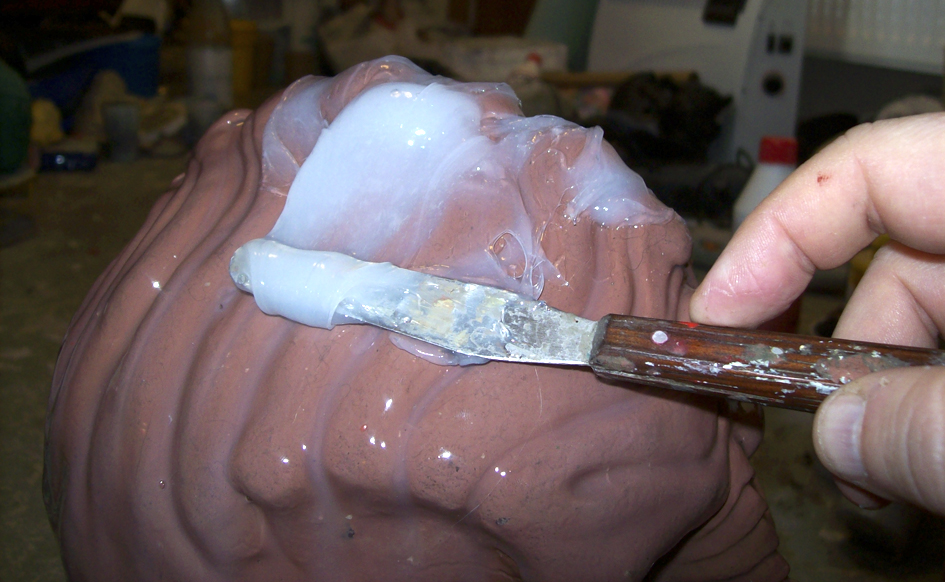
After this first layer I add up to five layers of silicone with a thickener added. This makes it easy to just slap it on like butter.

I also add some tints to each new layer of silicone, so I know I've covered all surfaces.

I like to add a support shell to some part of the silicone mold. If I don't it'll just flop around in my hands when I try to cast something in it, since the silicone is so soft. The nasty-looking stuff I'm mixing here is another SmoothOn product called Shell Shock, which is a brushable plastic.

I just ladle it on thickly over the back end of the skull mold. I put the mold on a black trash bag, since the plastic is pretty drippy. If I hadn't had any Shell Shock at home I would've used plaster bandages, which works almost just as well too.

When I'm casting in the silicone mold I'll put it into its plastic "cradle" first, which will help the silicone mold stay put in its shape until the material cast inside the mold have cured.

The silicone mold is so soft the sculpture comes out pretty intact. Only some of the teeth have fallen off.

I've cut a hole in the slit on the underside, where I'll pour the casting material. Time for more SmoothOn product placement! I'm using one of their plastics called SmoothCast 325. Like all the other stuff you mix two parts 50/50 and pour it into the mold. I've also added black pigments; If I hadn't, the plastic would have turned semi-transparent amber (which can be cool, but not for this project). I realized I actually didn't have enough plastic at home to make a strong enough casting, so I reinforced by pouring in Foam-it, which is a rigid polyurathane foam. It's very light but very hard.

Here's the finished plastic/foam cast pulled from the silicone mold. You can see the yellow foam shine through here and there.

You can swab down your casting with alcohol if you want to remove all traces of oil from the silicone, but I've never had any problems with DragonSkin molds, so I just go straight to priming it. Sometimes I use auto primer in a spray can, other times I use a transparent airbrush color primer (like I did now). It helps the paint stick better and I usually finish my paint jobs by spraying primer over the whole thing as a sealer.

A mix of white and earthy brown acrylic airbrush paints are sprayed on, and a thin layer of brown and yellow are added over that with some brown shading.

And there you go. If you want even better results, go out in your garden and rub some dirt over the skull; it actually takes any shine from the paint job off and adds unmistakeable details of age and wear. If you don't want to go through the hassle of molding and casting you can buy a plastic skull replica and build the Klingon features up with plumber's epoxy putty, making your sculpture and finished prop in one. Of course, having a mold means you can make copies of your skull :)


