Showing posts with label goblin. Show all posts

Tuesday, March 12, 2024

Will-O-The-Wisp


Last year I discovered American author and poet Madison Cawein, nicknamed The Keats of Kentucky since much of his output centered around his native state. I turned 50 this year, and I haven't exactly been a lazy wastrel, but Cawein, who passed away at 49, had at the time of his death 36 books and 1500 poems to his credit. I wilted a bit when I found that out, looking back at my life thus far and finding my output depressingly poor by comparison. His poem "Will-O-The-Wisp" is haunting, creepy, and a bit melancholy, and I thought it would make a good project for my YouTube channel.


Cawein has a very detailed description of his Will-O-The-Wisp character, which I found wonderfully eccentric. It's a goblin-like creature with webbed hands and feet, with additional whippoorwill features (which I might have added through a personal interpretation). This is the clay sculpture I ended up with. The milky plastic balls (or pearls) used for eyes here also ended up as the actual eyes in the final, finished puppet.


I used dense dental plaster to make a mold for my sculpture. Sometimes I use white hobby plaster, which is softer and cheaper, but for sculptures I've spent a bit of time on I use the denser dental plaster, so I know the mold will last for a while.


By now, you're already familiar with how I make bat-like wings, pressing down my armature in plaster and "painting" in the web sections with latex over both the armature and the plaster surface. The webbing between the fingers and toes was made this way, only I used clay instead of plaster.
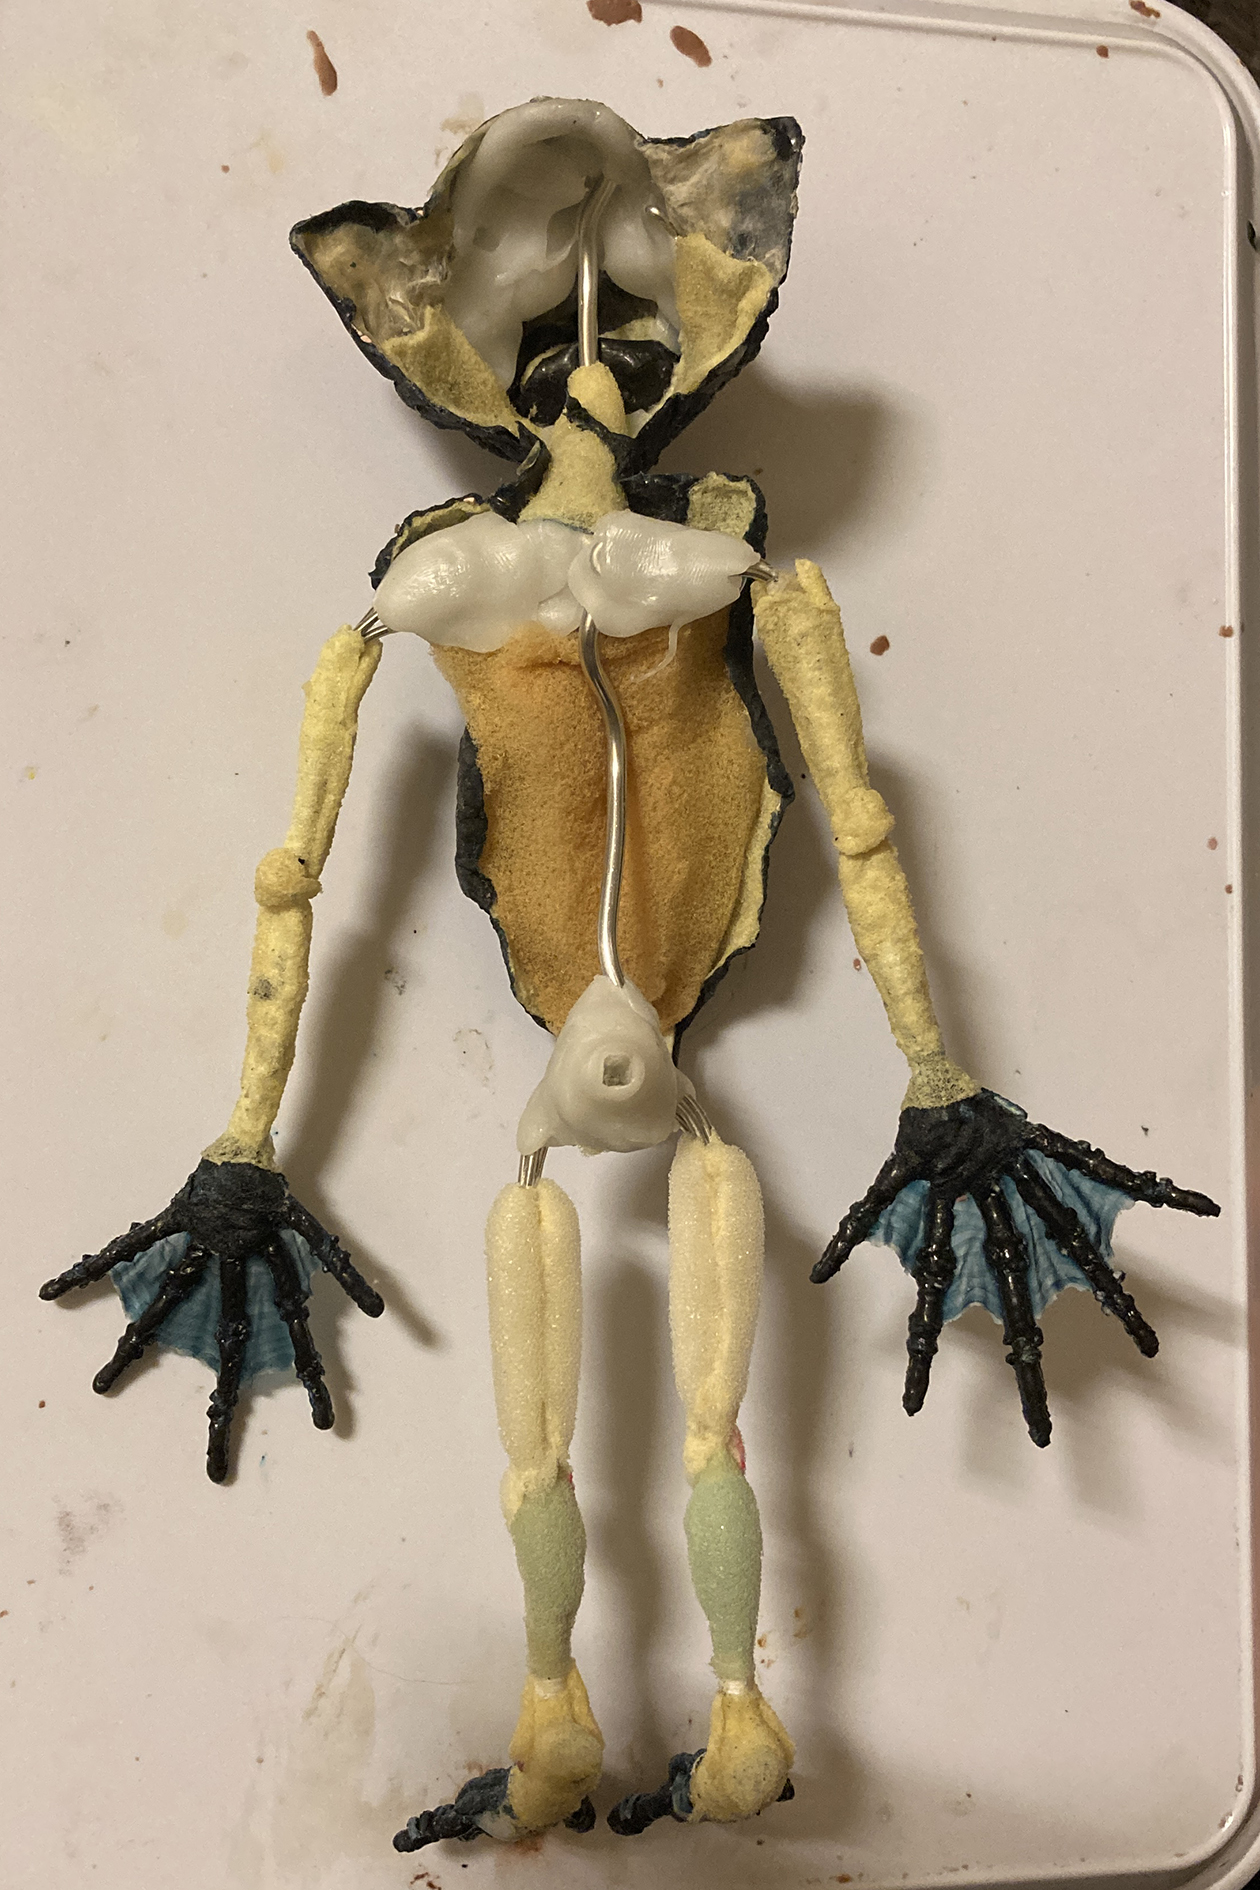

I made a very simple aluminum armature, held together with blobs of thermoplastic. Another blob was stuck to the bum of the puppet, where I inserted a square nail to create an attachment point for a flying rig. I've been recommended for years to turn from using a threaded bolt in the puppet and a flying rig arm with a threaded rod, and instead use a square rod and a square hole. That's all fine and dandy like sugar candy, but it's proven impossible for me to find square rods small enough to work for puppets, OR if I've found them, the materials have been prohibitively expensive. For example, you can buy a professional flying rig with the square rod solution, but the cost for that is currently beyond me. So, I figured I could do my own homemade version. However, the plastic attachment point proved to become slightly ground away by the metal nail inserted into it after a while, making the connection between the two parts quite loose. So, that was one experiment that turned out to not work as hoped.

The light yellow bits on arms and legs are thin polyurethane foam soaked in latex, and the green and darker yellow sections are ordinary foam.


Here's the puppet covered with patches of tinted latex cast in skin texture molds.


Here I've dabbed the puppet with tinted latex. It got a few more thin coats until it had a pale blue look.


I added a few bits of cotton dipped in latex to the mouth to make it look a bit more like the beak of a whipporwill. That strange bird also has some sort of bristles around its mouth so I added something like that too. The fetching hat and loincloth are made from "chunks-o-flesh" using latex tinted bone white -better explained it's latex applied to a flat surface, torn up when dry and allowed to bunch up into clumps of web-like material. 1 mm aluminum wires are hidden in the clothing items to make the flap in the wind during animation.


The backgrounds are a mixed bag of stills and footage, all of it from various stock media sources. For example, the background in the shot above is a close-up of real reeds slowly moving, while the reeds in front are CG animated.


The last shot is of a sickly-looking swamp, where the Will-O-The-Wisp encounters the spirit of a drowned man (the man is another stock image), is actually my first AI-generated image, made with Adobe AI. I think it worked out pretty well. 

I enjoy making videos based on poems, especially if they're moody and within the horror or fantasy genre. There's a bunch of them out there, so this one won't be my last adaptation.


Monday, July 9, 2018

Overheard On A Saltmarsh: Puppets and Film


The above video is my latest project; a very short adaptation of Harold Munro's prose poem "Overheard On A Saltmarsh." This short piece seems to be a perennial anthology favorite, and I've heard a few people say they read it in their schoolbooks. Basically, the poem is an argument between a goblin and a nymph, overheard by whoever scribbled down the text. In that context you're not really supposed to see the arguing creatures, only hear them somewhere out in the marsh. Of course, it was no point for me to make a film without showing the characters.


I've recently replaced my old tired PC laptop with a brand spanking new iMac, and I wanted to give my After Effects a proper test run on my new hardware. This short film seemed to be a good subject. And having bought a Mac also meant that my usual animation software of choice, StopMotionPro, was out since it won't run on Macs. Instead I invested in Dragonframe, and this film also gave me the opportunity to test that out as well.

Both characters are speaking in the film, and their mouths were animated, but in two different ways. Let's start with how the goblin was made.


The two artists who have defined the look of goblins and nasty fairies in pop culture more than anyone else are probably Arthur Rackham and Brian Froud. I tried to stay away from their interpretations and come up with something of my own, a creature which looked like he could live his entire life in the swamp. I made this goblin a sort-of mix between a toad and a rodent. This head and torso is sculpted in Monster Clay medium grade.


Hard dental plaster was used to create a sturdy mold over the sculpture.


Tinted latex goes into the mold, keeping the latex thick at certain spots and thin at others. The ear isn't cut off in this photo, it's just flopped down over my hand. I've also glued a small black plastic bead in place as the eye.


The goblin's mouth needed to be very flexible, since he had lots to say in the film. To give me the best flexibility when animating I simply made a loop of aluminum wire wrapped in soft string and then covered with latex. In this photo I haven't joined both ends of the wire into a loop yet. The joining was made using a mix of super glue and baking soda.


The armature for this puppet was actually built up one bit at a time, adapting it to how the padding of the torso turned out. The padding is bits of polyurethane foam, some of it soaked in latex.


The teeth are cotton dipped in latex and shaped with my fingers. They're attached using more latex as a bonding agent. The aluminum mouth wire is now stuck to the inside of the lips.


These little yellow sausages are actually strips of thin polyurethane foam, soaked in latex, allowed to dry and then rolled up. I'm using them as muscles to create organic shapes on the arms and legs. The good thing about this particular material in comparison to using rolls of cotton or strips of ordinary polyurethane foam, is that it will compress slightly, but mainly retain its shape. Which means that you can bend the limbs and have them look more natural and organic than when using those other mentioned materials.


To pad out the back of the puppet, making it look bulkier without adding a dense material, I used cotton balls. These will create a bulbous bulk on the puppet's body, but still allow the spine to bend and be animated very well.


This is how the foam sausages look when attached as muscles on the arm.


Here the whole puppet has been padded with latex-soaked foam and regular foam. The latex skin is pinned down to the foam using liquid latex as a glue.


The cotton balls on the back are covered with a thin sheet of foam.


The goblin covers his modesty with a loincloth made from lizard skin (bits of latex cast into a skin mold). Parts of these latex bits are supported by thin aluminum wires, so the loincloth sections can be animated, swaying to and fro as the goblin moves.


The finished goblin puppet is dry brushed with tinted latex, and weird bristles or hairs made from cotton dipped in latex now grow from the character's head. Also, bits of extra adornments have been added in the shape of small beads and bones made from cotton and latex.


Like with the goblin, I wanted to make something slightly unusual with the nymph. In the end I think she turned out fairly conventional. All of her appearance is built up around her eyes, which are acrylic doll's eyes. I sculpted this bust in medium grade Monster Clay.


For the casting procedure I separated the neck and the head for easier casting. Tinted latex created the skins of the pieces, and thin strips of polyurethane foam soaked in latex were pressed into these latex castings before they were removed from the plaster mold.


A bundle of aluminum wires wrapped in soft string goes up through the neck, and is attached to the head using Polymorph thermo plastic as a bonding material (also creating a skull for the head.)


Latex-soaked foam is pressed together around the armature, slowly shaping subtle muscles, which are then covered with tinted latex.


Here's a snapshot of the process. The legs are being covered with wrappings of foam that have been soaked in liquid latex and allowed to dry.


The legs and arms are given circa five layers of tinted latex, puddled on using pipe cleaners as brushes. I'm speeding up the drying process using a heat gun on its lowest setting.


Since her torso won't be exposed, no skin is added there.


To create a spiky, unkempt hairstyle I'm cutting bundles of hair from the collar of an old coat, using latex to glue it down onto the head. When the latex dries it'll turn transparent.


The nymph has a small dress or top made from brownish leaves. I sculpted a few leaves in clay and created a plaster mold over them, so I could cast a bunch of them in latex.


The finished dress is given a dash of acrylic airbrush paints painted on with an ordinary brush to create some shadows within the shapes of the leaves. This puppet does not have any attachment points in its feet, like most of my puppets (the goblin, for example). Instead she has a t-nut in her posterior, so I can have her sit absolutely still when animating her upper body. The glass beads, over which the characters argue, are from a bag of trinkets I've collected over the years for use in my puppet projects.


The nymph's mouth is not animated on the puppet, but separate elements created in Photoshop are animated to move in sync with the speech of the character. I'm using photos of a real mouth.
As for who's talking, I'm doing the voice of the goblin, pitched at a lower register, and the nymph is an Irish lady doing voice overs for fun and profit.

The actual marsh is represented by footage of a British marsh by a lake, and the close-ups are reeds and grass that grow around a pond in my garden.

This was a fun project to do, though the process of syncing the animated mouths with the recorded speech took quite some time. It's not 100% perfect, but it does get the point through, I hope. I'll do some more folklore-themed projects this year. It's a subject very dear to my heart, and I haven't touched on it in my videos as much as I'd want, so far.


Friday, November 3, 2017

Halloween Weirdos

Some people have been telling me for years to make a YouTube Halloween video, and this year I finally made one. I spent a week on the project, and used mostly older puppets, but a few unused ones snuck in there too. Here's the video:


But I managed to make two new puppets. Here's the first one.


This is actually a quite old latex cast I found in one of my stashes of stuff-I-should-throw-away-but-never-does. Originally it was supposed to be a Mewlip (featured in my Mewlips video), but I decided to go in another direction with these creatures and discarded this design. However, I had already cast this latex skin and added the two reflective bead eyes. Since the skin was in good shape despite the years (latex will, as you know, start to crumble after some time) I decided to use it for one of my new Halloween puppets. I added sheets of polyurethane foam on the inside of the skin, using liquid latex as a bonding agent, to bulk it up a bit.


I also bulked up the aluminum wire armature with some foam wrappings. Cotton and latex was used to build up muscles on the lanky arms, and a pair of latex wings were attached to the back of the armature. You can see the whole wing-making process HERE.


Here the puppet has been given a skin made from patches of latex skin cast in plaster molds. The nails are made from thick paper dipped in latex.


And here's the finished puppet. I also placed a wing nut in the puppet's posterior, so I can attach a flying rig.


Here's the second original puppet in this video. It's a lanky, pot-bellied zombie with a slightly (or maybe very) cartoony look. Like with the other puppet I had already sculpted the torso and created a mold for it. I can't actually remember what I made the sculpture for, but I thought it would fit right in here, and it did. As you can hopefully see in this photo the cast latex skin has been padded with thin sheets of polyurethane, and the armature has also been padded in the same way. Also, this guy has a wing nut in his butt.
These two puppets are very simply and quickly made, but perfectly functional in every way. What cuts down the construction time in this case is that none of the puppets have articulated faces. No rotating eyes or jointed jaws.


The finished goofy zombie. Both these guys flut past the camera so quickly it'd be a waste to just use them once. No idea what the future holds, but I'm sure you haven't seen the last of them.